This is the multi-page printable view of this section. Click here to print.
Configuration Reference
- 1: List of Configuration Parameters
- 2: Replacing the Camera Model
- 3: High-Resolution Mode
- 4: Creating Setting Templates
1 - List of Configuration Parameters
The VirtualLens Settings component generated automatically during setup contains various parameters. By modifying these parameters and reapplying them, you can customize the behavior of VirtualLens2 to a certain extent.
General Settings
Build Mode
Choose whether to use non-destructive editing or destructive editing during the setup of VirtualLens2.
Avatar
Configure the avatar to be set up. It must have a VRCAvatarDescriptor component and be set up as a humanoid avatar. When using the non-destructive workflow, the avatar included in the object containing that VirtualLens Settings component will be the one set up.
Camera Object Settings
Camera Mesh Settings (Root Object, Non-Preview Root)
Configure the settings for the camera object displayed at hand when using VirtualLens2. For more details, refer to Replacing the Camera Model.
Auto Placement
Re-run the automatic placement of the camera mesh. This can be useful for resetting the placement or replacing the camera model later.
Marker Objects
Select objects used as reference points for position and orientation in various functions. You can customize related behaviors by adjusting the positions of these objects as needed.
Screen Touchers
These are objects used for touch screen hit detection. Normally, they are placed at the tip of the index finger of the hand without the camera.
Drone Controller
This is an object indicating the position for displaying the controller used to control speed in drone mode. It is usually located near the palm of the hand without the camera.
Reposition Origin
This is an object indicate the position corresponding to the point before the repositioning when using the repositioning mode. It is usually placed slightly in front of the chest.
Selfie Markers
These are objects representing the points to focus on when using the selfie autofocus. They are usually placed near the pupils of each eye.
Settings for Continuous Value Parameters
Focal Length
Set the upper and lower limits and default values of the focal length in values equivalent to full-frame sensors (35mm format).
| Min Focal Length [mm] | Set the lower limit of the focal length. |
|---|---|
| Max Focal Length [mm] | Set the upper limit of the focal length. |
| Default Focal Length [mm] | Set the default focal length value. |
| Sync Parameter for Remote | Synchronize the focal length parameter with remote players. |
Aperture
Set whether to implement depth of field simulation, and the upper and lower limits and default values for the aperture size in terms of F-stop.
| Enable DoF Simulation | Set whether to implement depth of field simulation. |
|---|---|
| Min F Number | Set the lower limit of the F-number (wide-open aperture value). |
| Max F Number | Set the upper limit of the F-number. |
| Default F Number | Set the default F-number. If it is equal to Max F Number, depth of field simulation is disabled. |
| Sync Parameter for Remote | Synchronize the F-number parameter with remote players. |
Manual Focusing
Set whether to implement manual focusing, and the range of distances that can be focused on in meters.
| Enable Manual Focusing | Set whether to implement manual focusing. |
|---|---|
| Min Focus Distance [m] | Set the minimum shooting distance when using manual focusing. |
| Max Focus Distance [m] | Set the maximum shooting distance when using manual focusing. |
| Sync Parameter for Remote | Synchronize the focus distance during manual focusing with remote players. |
Exposure Compensation
Set whether to implement exposure compensation and the range and default value for the compensation value in EV (exposure value).
| Enable Exposure Compensation | Set whether to implement exposure compensation. |
|---|---|
| Exposure Range [EV] | Set the range of exposure compensation values. |
| Default Exposure [EV] | Set the default exposure compensation value. |
| Sync Parameter for Remote | Synchronize the exposure compensation value with remote players. |
Drone Function
Set whether to implement the drone function and configure parameters such as speed.
| Enable Drone | Set whether to implement the drone function. |
|---|---|
| Speed Scale | Adjust the speed of the drone. The amount of movement per second is determined by multiplying this value by the input from the controller. |
| Dead Zone of Speed Controller | Set the radius in meters at which input speed from the controller is considered to be zero. |
| Yaw Speed Scale | Set the speed of rotation caused by left and right directional input in 2D puppet mode. This value determines the angle change per second when the input is at maximum. |
| Enable Quick Turn | Toggle the quick turn feature on or off. |
| Enable Zoom Control | Toggle the zoom control via the up-down input of the 2D Puppet on or off. |
Clipping Planes
Set the range of the camera used by VirtualLens2 for shooting.
Control of External Objects
Optional Objects
Set objects that are enabled or disabled in conjunction with VirtualLens2. If the checkbox is enabled, the objects are enabled when VirtualLens2 is enabled and disabled when it is disabled. If the checkbox is disabled, the opposite occurs.
Hideable Meshes
Set objects for controlling visibility using the mesh hiding feature. If the feature is enabled, the enabled or disabled state of MeshRenderer or SkinnedMeshRenderer components in the specified objects will be controlled.
Calling Presets (Quick Calls)
Set up to 8 presets that can be called using the preset feature. Only the checked items for focal length, aperture, and exposure compensation will be updated to the specified values.
Display Settings for the Preview Screen
Changing Default Settings (Grid, Information, Level, Peaking)
Configure the items to be displayed on the preview screen by default. Each item and its value corresponds to the settings for preview screen information display.
カスタムグリッドの設定 (Custom Grids)
Register up to four images that can be used instead of a grid. It is recommended that the images meet the following requirements:
- Have opacity in the alpha channel (enable “Alpha is Transparency”)
- Have a resolution of 1280x720
- Disable automatic resizing to power-of-2
- Do not generate mip maps
You can refer the example (VirtualLens2/Textures/CustomGrid_Example.png) in the package.
Auto Focus Settings
Change the default settings for auto focus. Each item and its value correspond to the auto focus mode and parameters settings.
Settings for Image Processing Algorithms
Configure settings related to image quality and performance, such as parameters for depth of field simulation.
| Enable 4K Capturing | If checked, enable 4K capturing. |
|---|---|
| Max Blurriness | Set the maximum blur radius for depth of field simulation. |
| MSAA Samples | Set the MSAA sample count. Increasing this value will smooth out polygon edges at the cost of higher performance load. |
| Post Antialiasing | Choose the algorithm for anti-aliasing applied as post-processing. |
| Realtime Post Antialiasing | Choose the anti-aliasing algorithm used for rendering the preview screen when 4K capturing mode is enabled. |
Advanced Settings
| Artifacts Folder | (Destructive setup only) Specify the folder where automatically generated files will be saved during setup. If left empty, a folder will be created automatically. |
|---|---|
| Clear Artifacts Folder | (Destructive setup only) If enabled, clears the contents of the Artifacts Folder during setup. |
| Thickness of Touch Screen | Adjust the thickness of the touch detection on the preview screen. A larger value increases the detection range. |
| Enable Write Defaults | If enabled, automatically generated Animator State's Write Defaults will be enabled. |
| Depth Enabler | Set whether to the enabling depth texture feature by default. |
| External Pose Source | Set the object referenced when using the external pose input feature. |
| Remote Only Mode | (Non-destructive setup only) Set up only the necessary functions for displaying avatars from other players when VirtualLens2 is enabled, omitting features like photography. |
Settings for Modular Avatar Integration
This is displayed only when you are using a destructive setup while the Modular Avatar is imported into the project. For more details, also refer to Integration with Modular Avatar (Legacy).
| Enable Modular Avatar Integration | If enabled, use Modular Avatar to apply changes to the avatar. |
|---|
2 - Replacing the Camera Model
Using VirtualLens2-Compatible Prefabs
If the package of the 3D model you want to use includes VirtualLens2-compatible prefabs, please refer to the documentation provided with the model data and setup guide. If the Prefab contains objects named VirtualLensOrigin and VirtualLensPreview, it is likely compatible with VirtualLens2.
Simple Replacement Procedure
Here, we’ll explain the procedure for displaying a 3D model as a camera when there are no VirtualLens2-compatible prefabs or setup instructions available. If you wish to create a prefab for sharing with other avatars or distribute a pre-configured mesh, please refer to the more detailed instructions below.
Preparations
If there is a default camera model, remove CompactCamera from the Hierarchy.
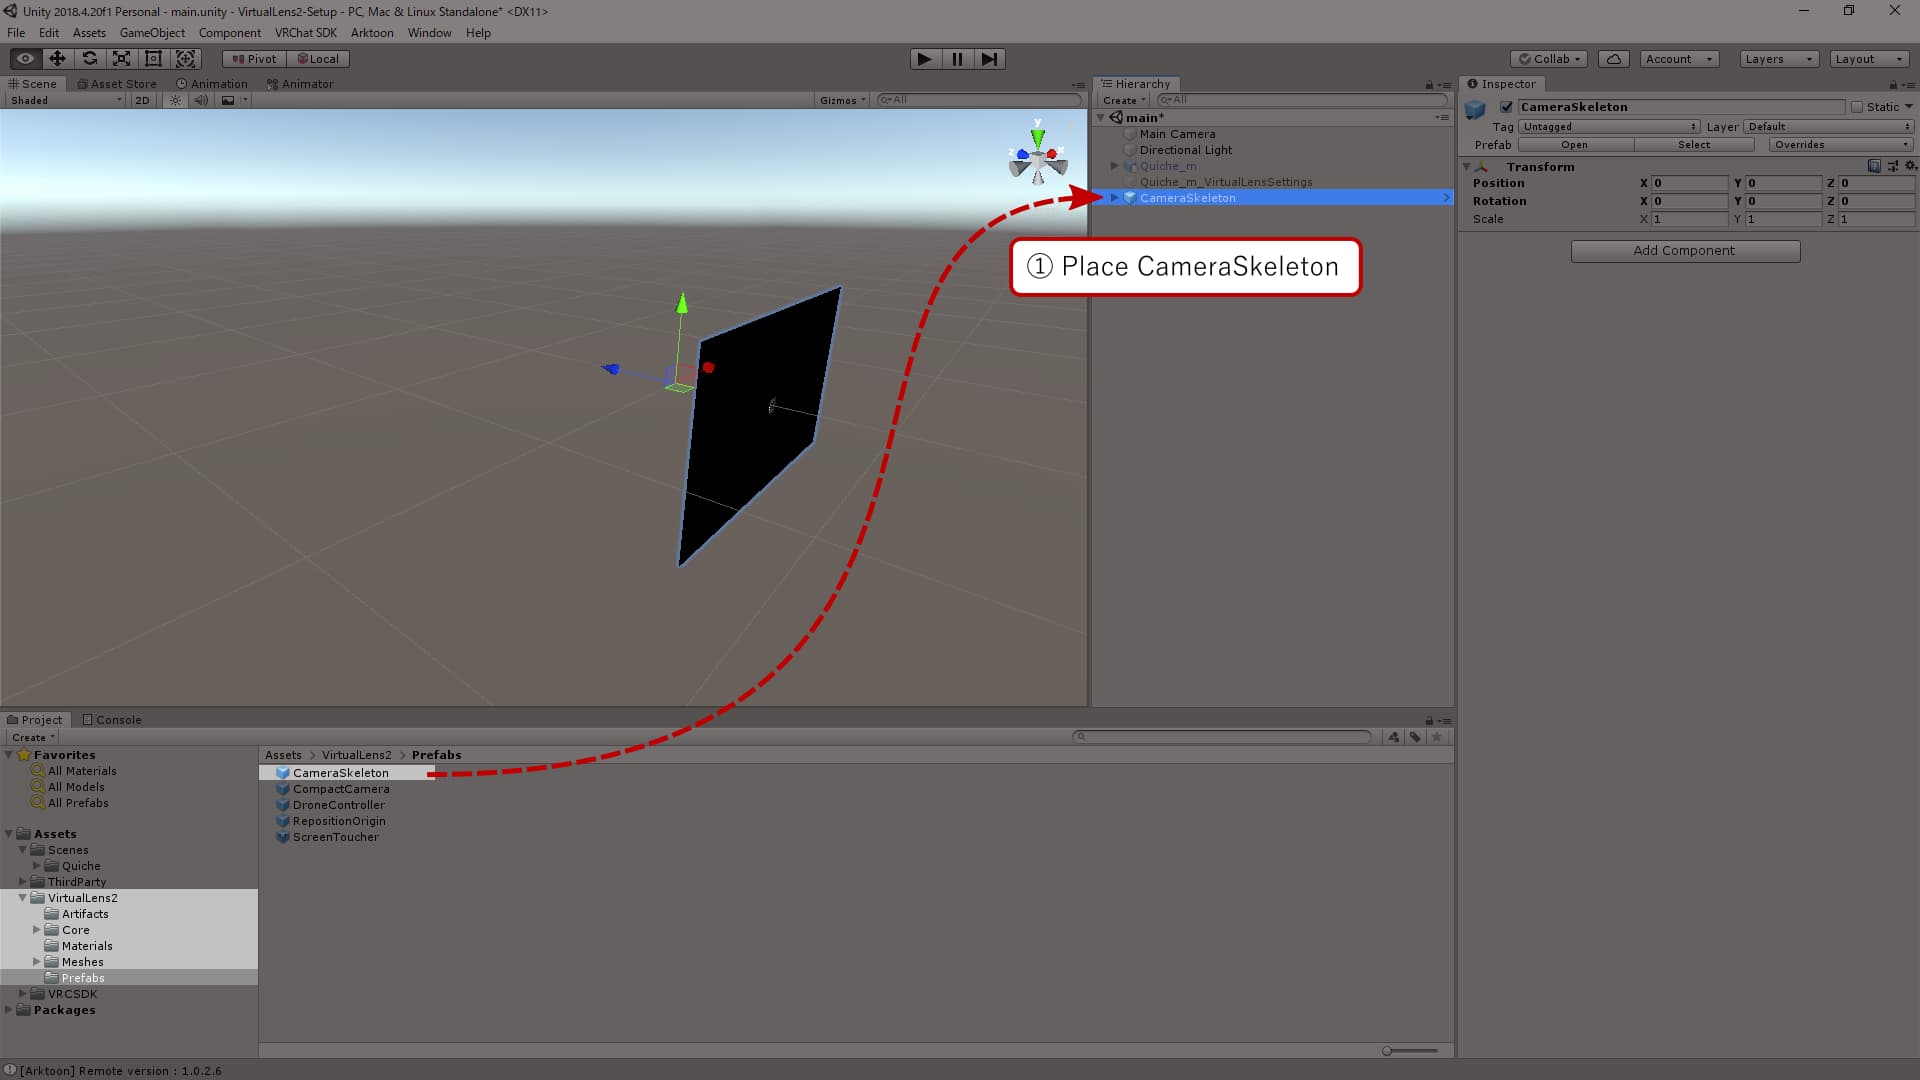
Placing the Template Prefab
Add VirtualLens2/Prefabs/CameraSkeleton.prefab to the scene.
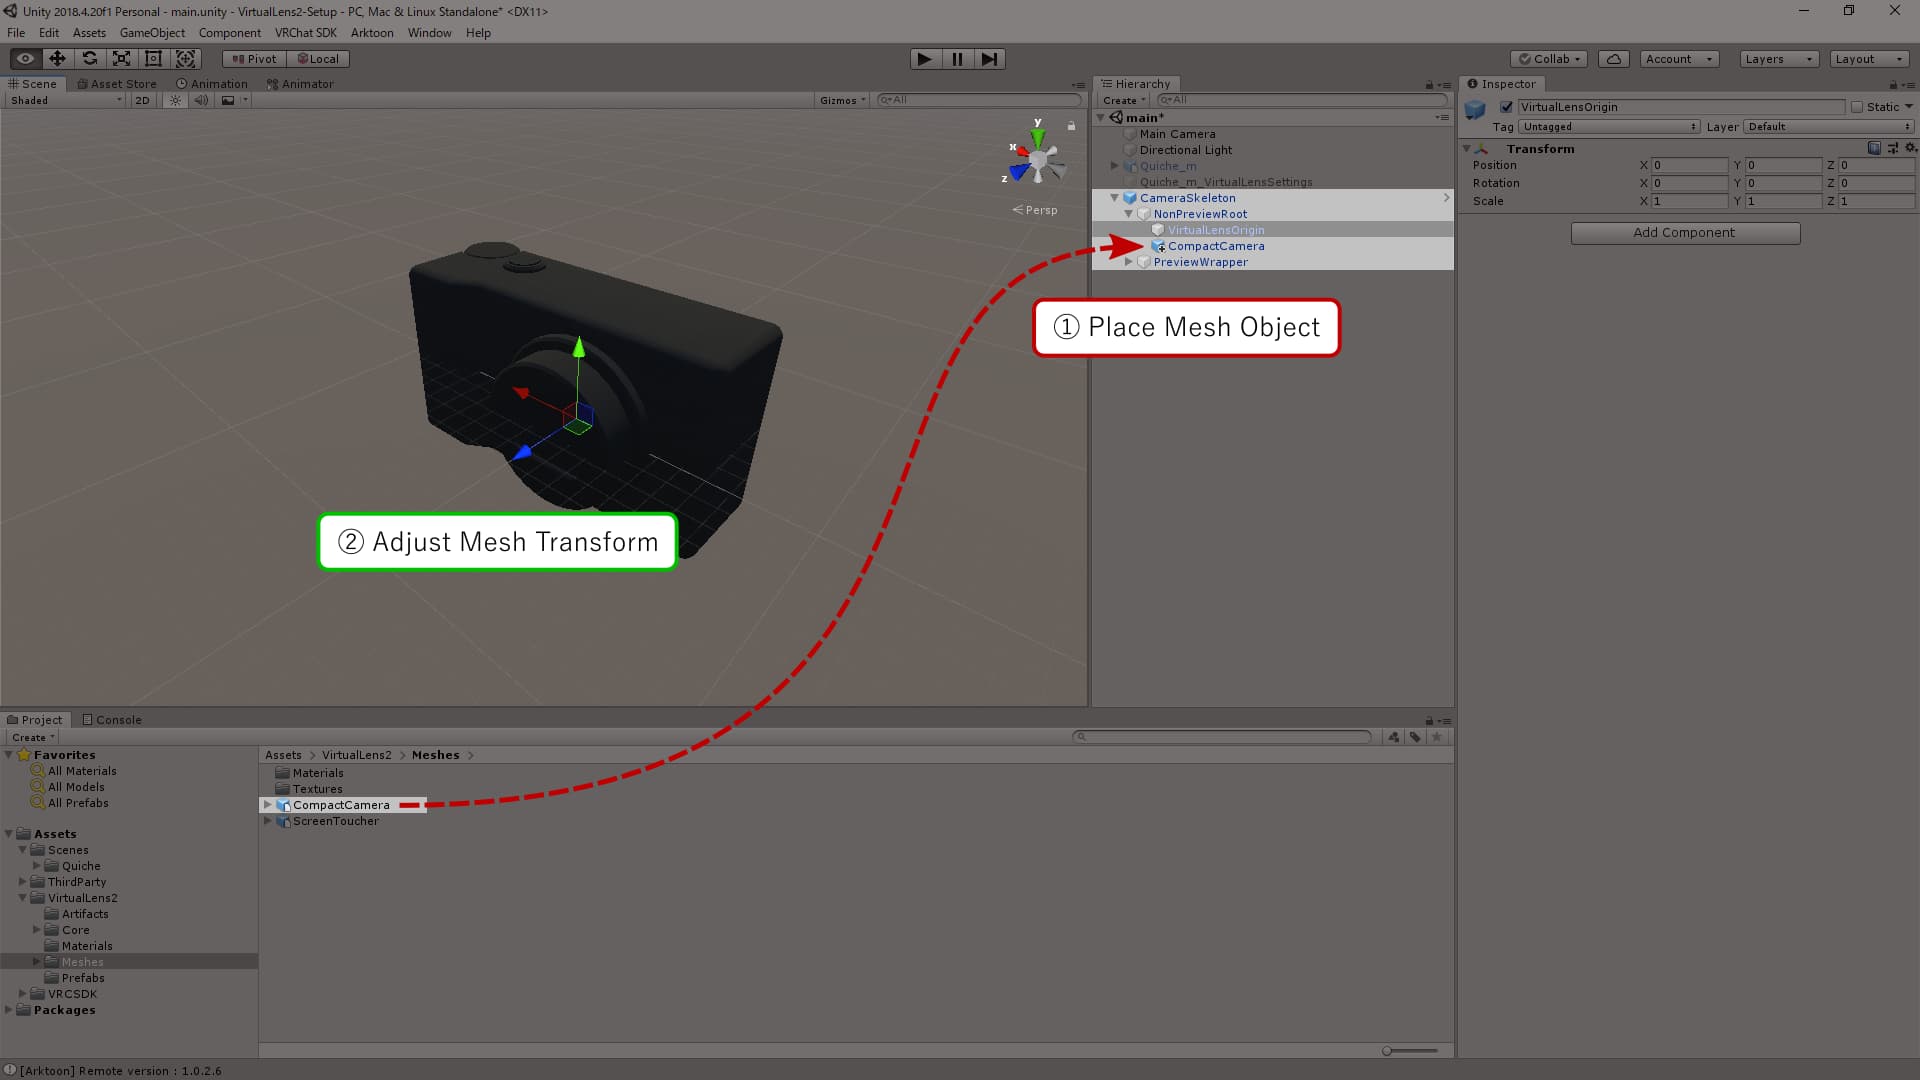
Placing Custom Mesh
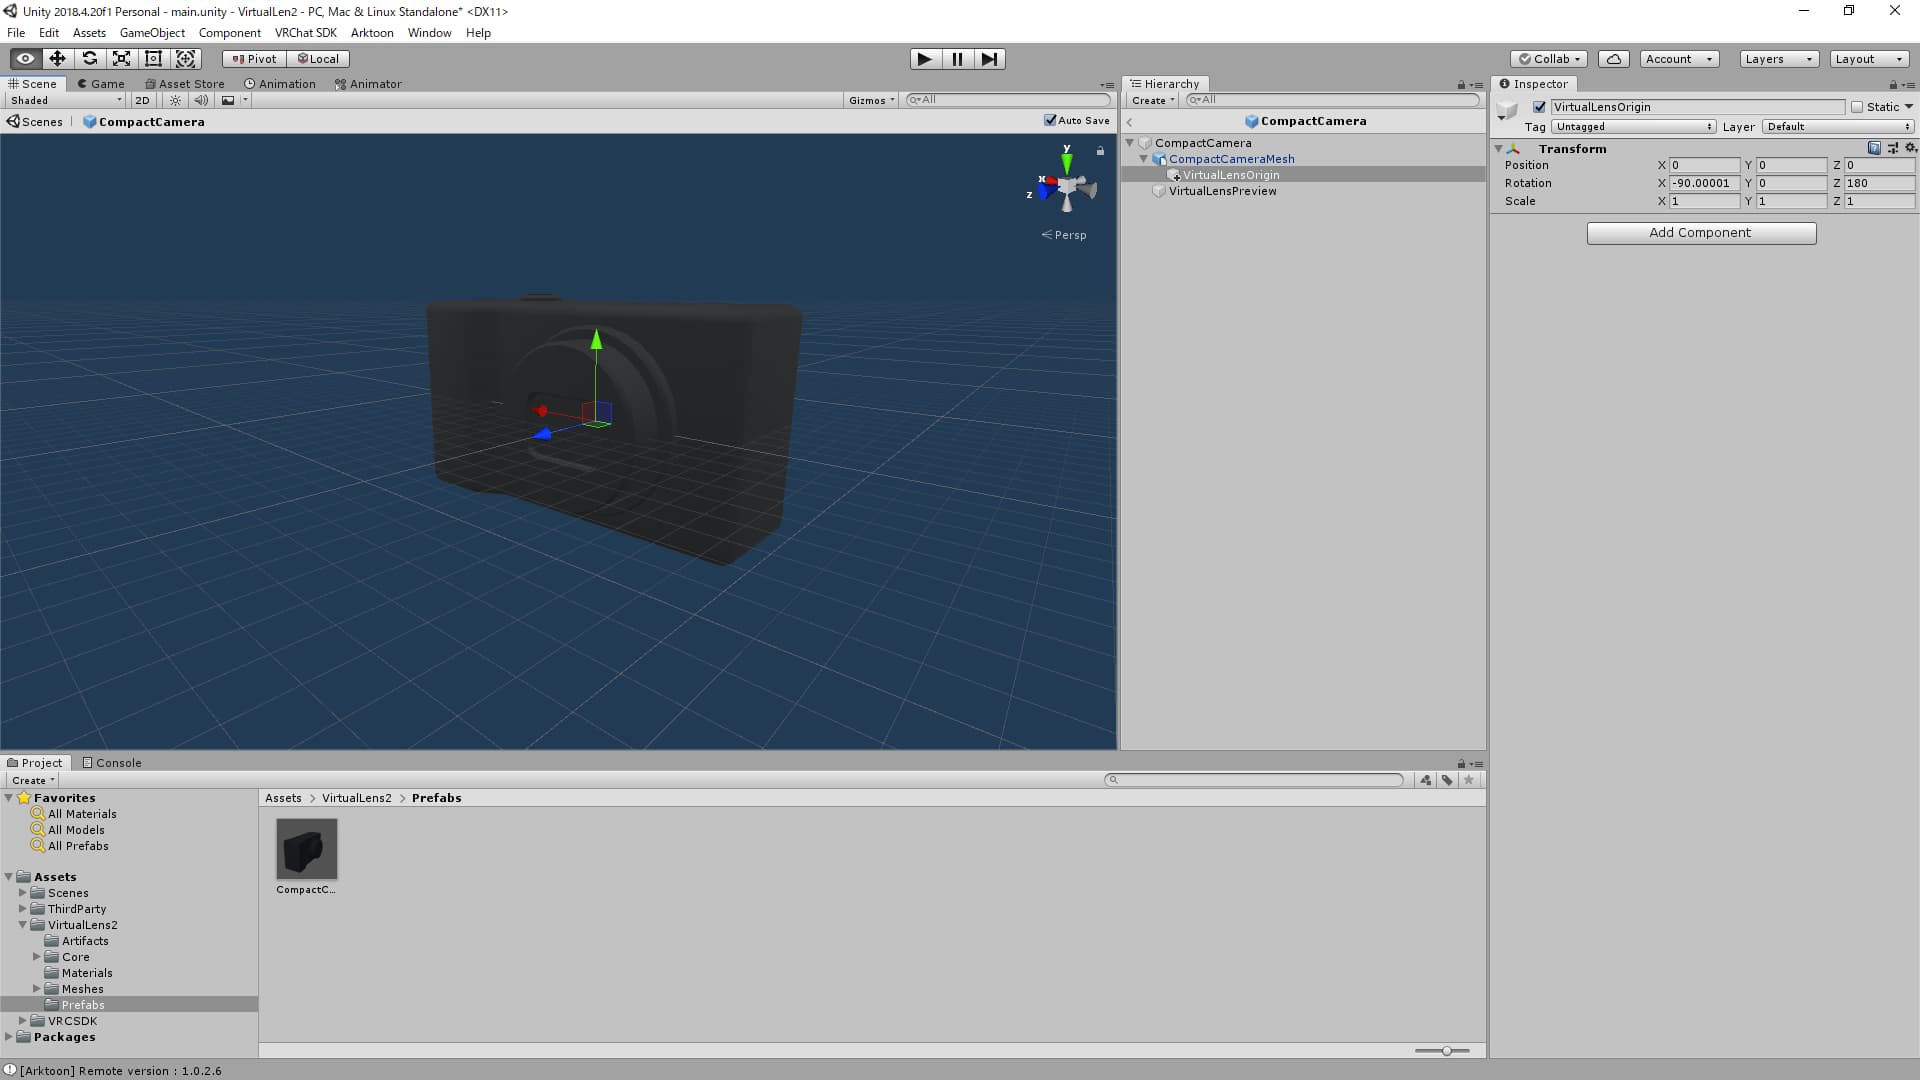
Place the mesh you want to use as a child of NonPreviewRoot. Since the camera captures from the position of VirtualLensOrigin, adjust the position of VirtualLensOrigin to be at the center of the lens or as needed. Also, be careful that no visible polygons are more than 0.05m away from the line of sight (positive Z-axis direction) from VirtualLensOrigin as this could cause reflections in the camera mesh.
Adjusting the Preview Screen Position
Adjust the position and size of the preview screen, including the touch screen PreviewWrapper. When doing this, make sure to set the Scale values (x, y, z) to the same value to maintain the aspect ratio.

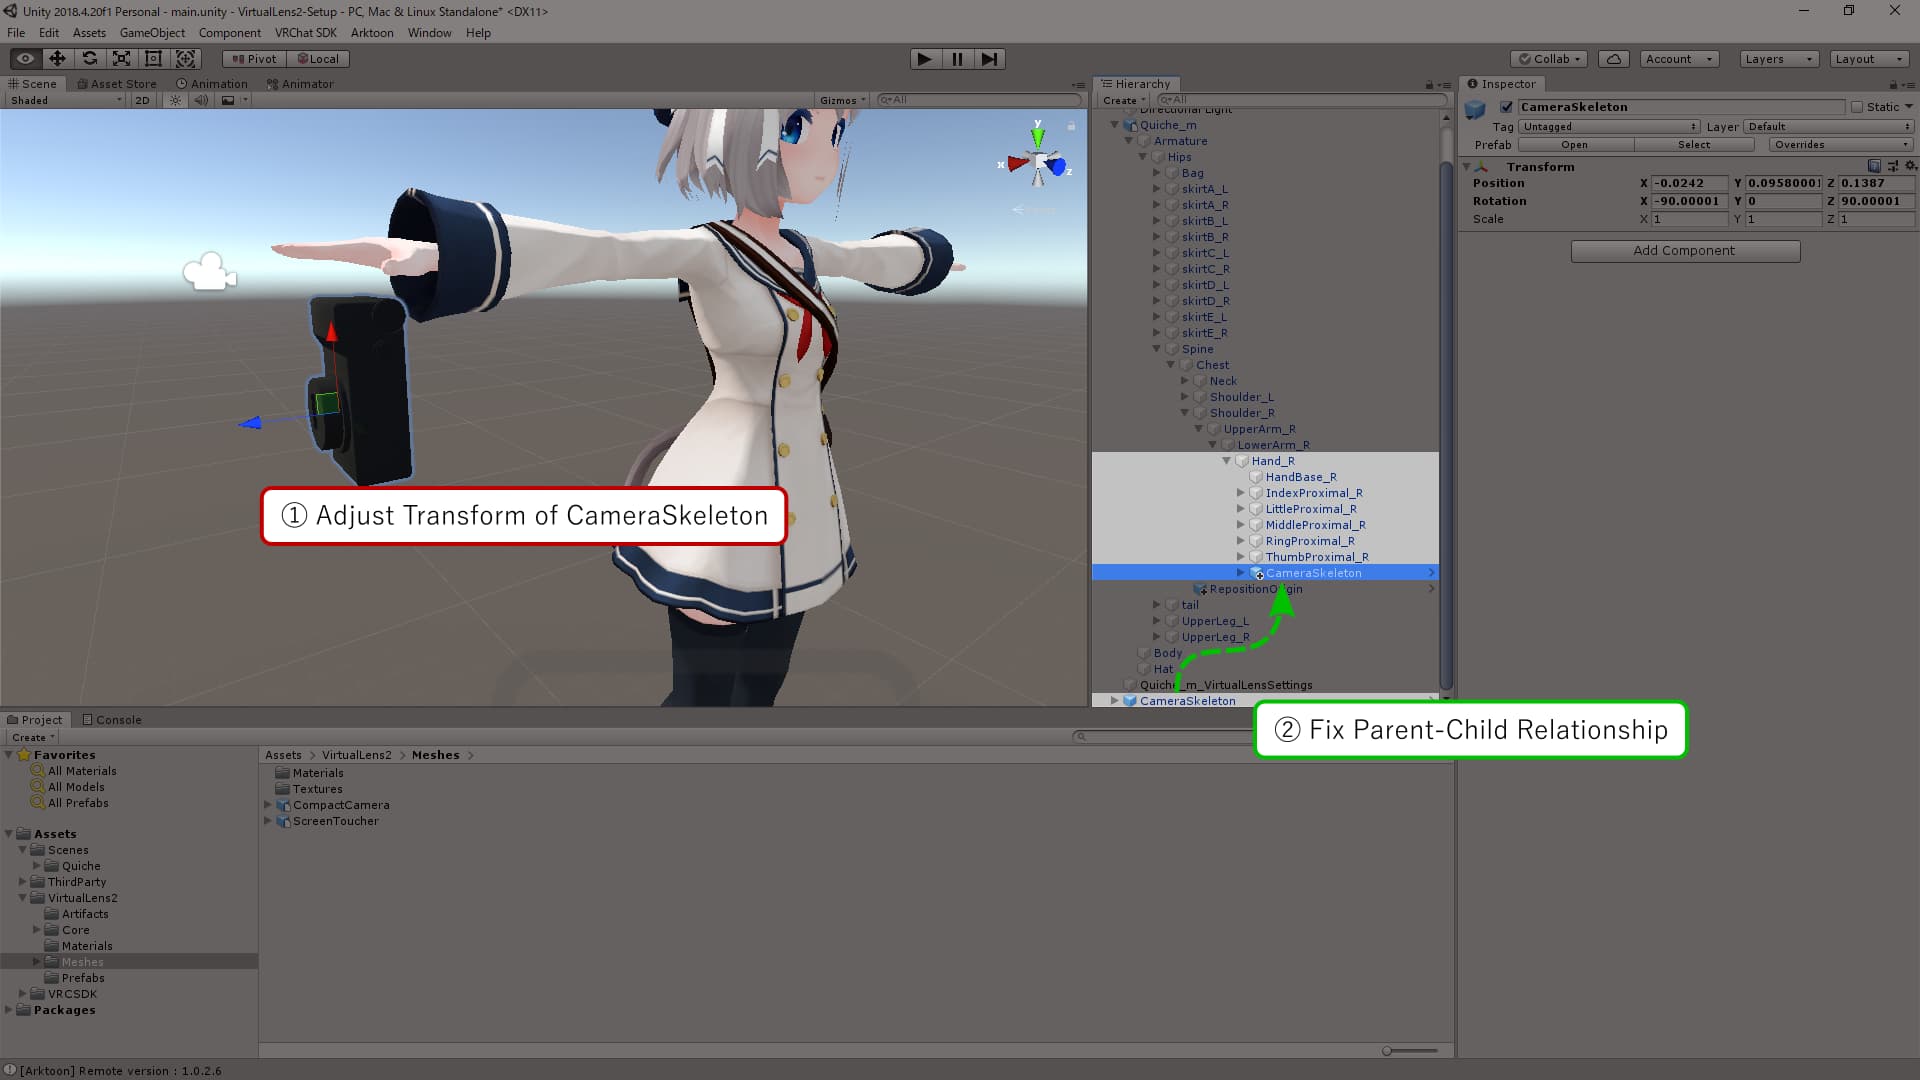
Modifying Parent-Child Relationships within the Avatar
After adjusting the position of CameraSkeleton, move it to be a child of the objects you want to interact with.
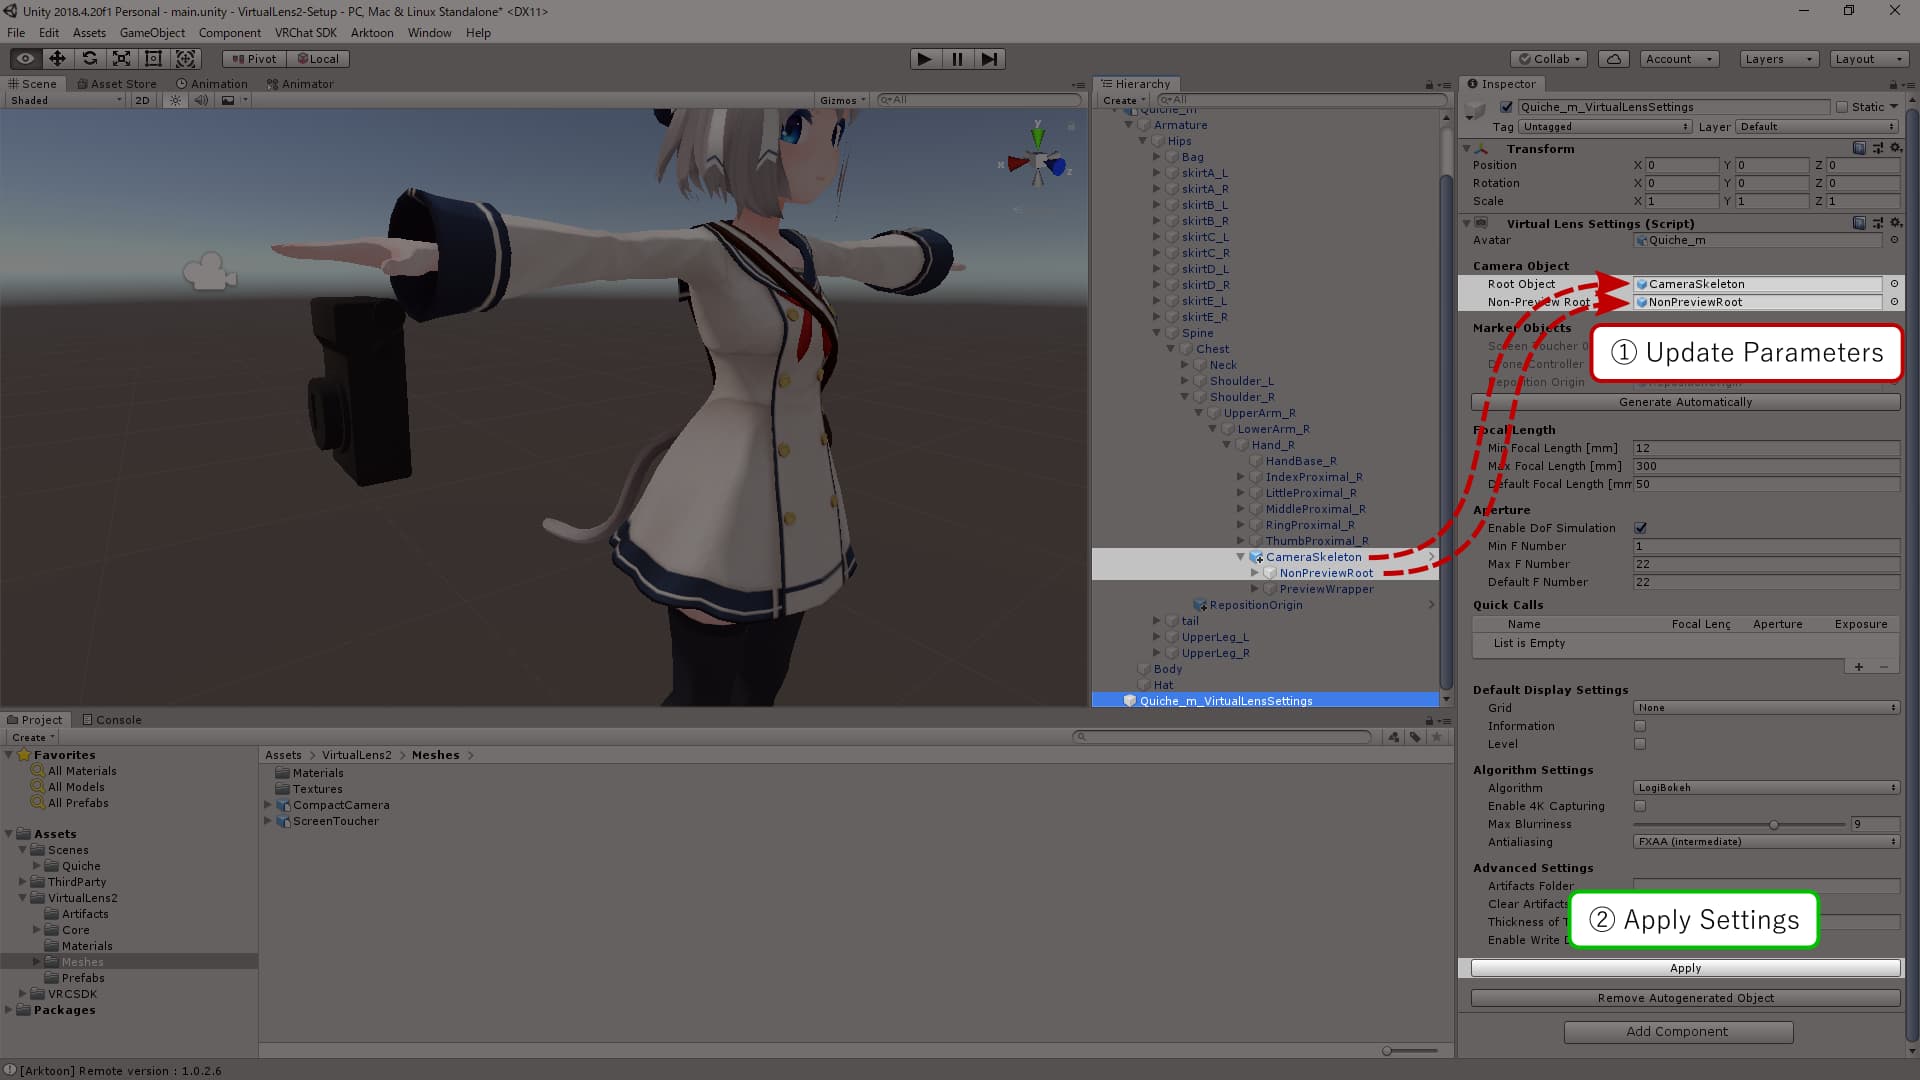
Updating Settings
Update the settings in VirtualLens Settings under the “Camera Object” section as follows, then press the “Apply” button to apply the settings:
Root Object:CameraSkeletonNon-Preview Root:NonPreviewRoot
Note that if you change the position of objects after applying the settings, you will need to press the “Apply” button again to update the settings.
Detailed Explanation
Reference Objects
VirtualLens2 uses objects with specific names as references to automatically generate various components. By preparing these objects appropriately, you can use your custom 3D model as a camera. In this section, we will explain how to position reference objects using the camera model included with VirtualLens2 (Assets/VirtualLens2/Prefabs/CompactCamera.prefab) as an example.
VirtualLensOrigin
This object serves as the reference when placing the camera component for capturing. The positive Z-axis of this object represents the front, and the positive Y-axis represents the up direction. The camera component is generated based on this orientation.
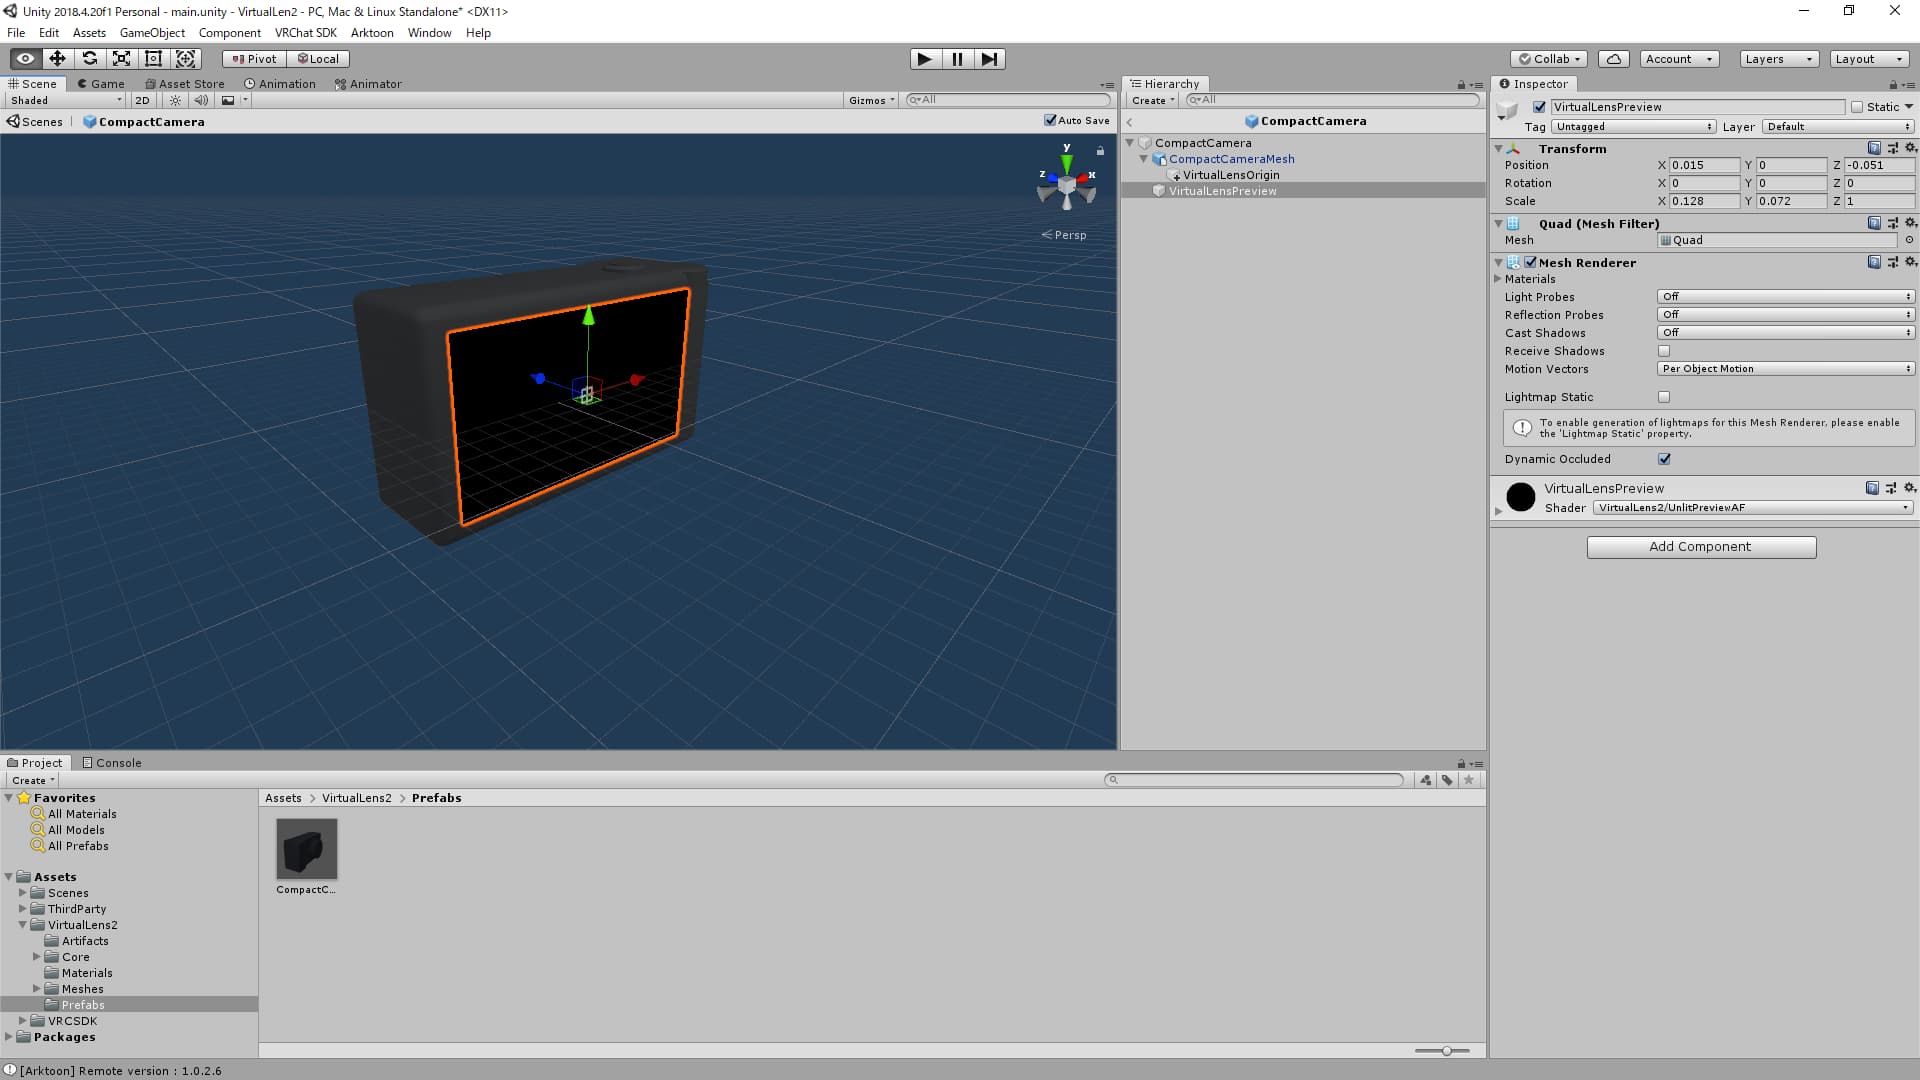
VirtualLensPreview
This object serves as the reference for interface placement to specify the focus point. The camera component for touch detection is generated based on the orientation and Y-axis scale of this object.
It’s worth noting that CompactCamera.prefab includes a MeshRenderer for the preview screen, but this is not mandatory. You have the option to render it on a different object or not render it at all.
Preview Material
A material for the preview screen is provided as Assets/VirtualLens2/Materials/VirtualLensPreview.mat. You can apply it to objects like a quad to generate a preview screen that includes touch information. You can find examples of its usage in the contents of the package, such as CompactCamera.prefab.
Distributing VirtualLens2-Compatible 3D Models
If you intend to distribute a 3D model designed for use with VirtualLens2, consider preparing a prefab that includes the reference objects mentioned earlier and uses the VirtualLensPreview.mat material for the preview screen. This will simplify the setup when integrating it with VirtualLens2. If you plan to distribute or sell your model, including such a prefab is a good idea.
3 - High-Resolution Mode
Basic Settings
VirtualLens2 Settings
When setting up your avatar, configure the “Default Resolution” under Algorithm Settings in VirtualLens Settings to the resolution you normally use.
If you need to temporarily use a different resolution, you can adjust the internal resolution via the Expressions Menu. Be sure to also update the settings on the VRChat standard camera accordingly.
VRChat Settings
In the built-in VRChat camera menu, select a resolution that matches the VirtualLens2 settings.
Considerations
Behavior When Settings Don’t Align
If the resolution settings in VirtualLens2 and VRChat do not match, it may result in image degradation. Ensure the settings are aligned for optimal quality.
Compatibility with Stream Camera
When using Stream Camera, its resolution is determined by the size of the desktop window. If the window size is not adjusted correctly, it may cause image quality issues similar to those caused by mismatched settings.
If you need finer control over the output resolution, consider using Spout in conjunction with VirtualLens2.
4 - Creating Setting Templates
VirtualLens2 has a variety of configuration parameters, and when you need to set up for multiple avatars with almost identical settings, it can become a time-consuming task to input the parameters repeatedly. In such cases, creating setting templates can help you streamline the process by skipping the input of common parameters.
Creating Setting Prefabs
Start by performing the setup using the standard procedure. The object with VirtualLens Settings that is generated during this setup can be turned into a setting prefab by dragging and dropping it into the project view. When doing this, you will be prompted to either create a new prefab or create a prefab variant. Generally, it is recommended to create it as a prefab variant.
v2.9.0-: A default setting prefab (VirtualLens2/Prefabs/DefaultSettings.prefab) is now provided. VirtualLens Settings created by the setup helper in versions prior to v2.8.x does not reference this prefab. Therefore, it is recommended to recreate the setting prefab for compatibility with future updates.
Using Setting Prefabs
When setting up VirtualLens2 for a new avatar, specify the prefab you created in the “Settings Template” field of the setup helper. This will enable the settings to be based on the template you created instead of using the default settings that come with VirtualLens2.