Welcome to VirtualLens2 user guide!
This is the multi-page printable view of this section. Click here to print.
Document
- 1: Getting Started
- 1.1: Setup Guide
- 1.2: Shooting Guide
- 1.3: Upgrade Guide
- 2: Feature List
- 2.1: Basic Features: Zoom, Aperture, Exposure
- 2.2: Focus Control
- 2.3: Position and Orientation Control
- 2.4: Other Features
- 3: Configuration Reference
- 3.1: List of Configuration Parameters
- 3.2: Replacing the Camera Model
- 3.3: High-Resolution Mode
- 3.4: Creating Setting Templates
- 4: Developer Guide
- 5: Frequently Asked Questions
- 6: Changelog
- 7: Readme
1 - Getting Started
These guides explain the minimal setup steps and usage instructions for VirtualLens2.
1.1 - Setup Guide
This guide explains the steps to integrate VirtualLens2 into your avatar.
Requirement Check
Before setting up VirtualLens2, please ensure that the target avatar meets the following requirements:
- It is set up using VRCSDK 3.7.0 or later.
- Modular Avatar 1.8.0 or later is imported into the project.
- Expression Parameters have a margin of at least 8 bits.
Info
Starting from VirtualLens2 v2.10.0, the non-destructive workflow with Modular Avatar has become the standard setup procedure. If you cannot use Modular Avatar for some reason, you can use the traditional setup (destructive setup).Import Modular Avatar
Refer to the Modular Avatar documentation and import Modular Avatar into your project. If it’s already imported, make sure the version is 1.8.0 or later.
![]()
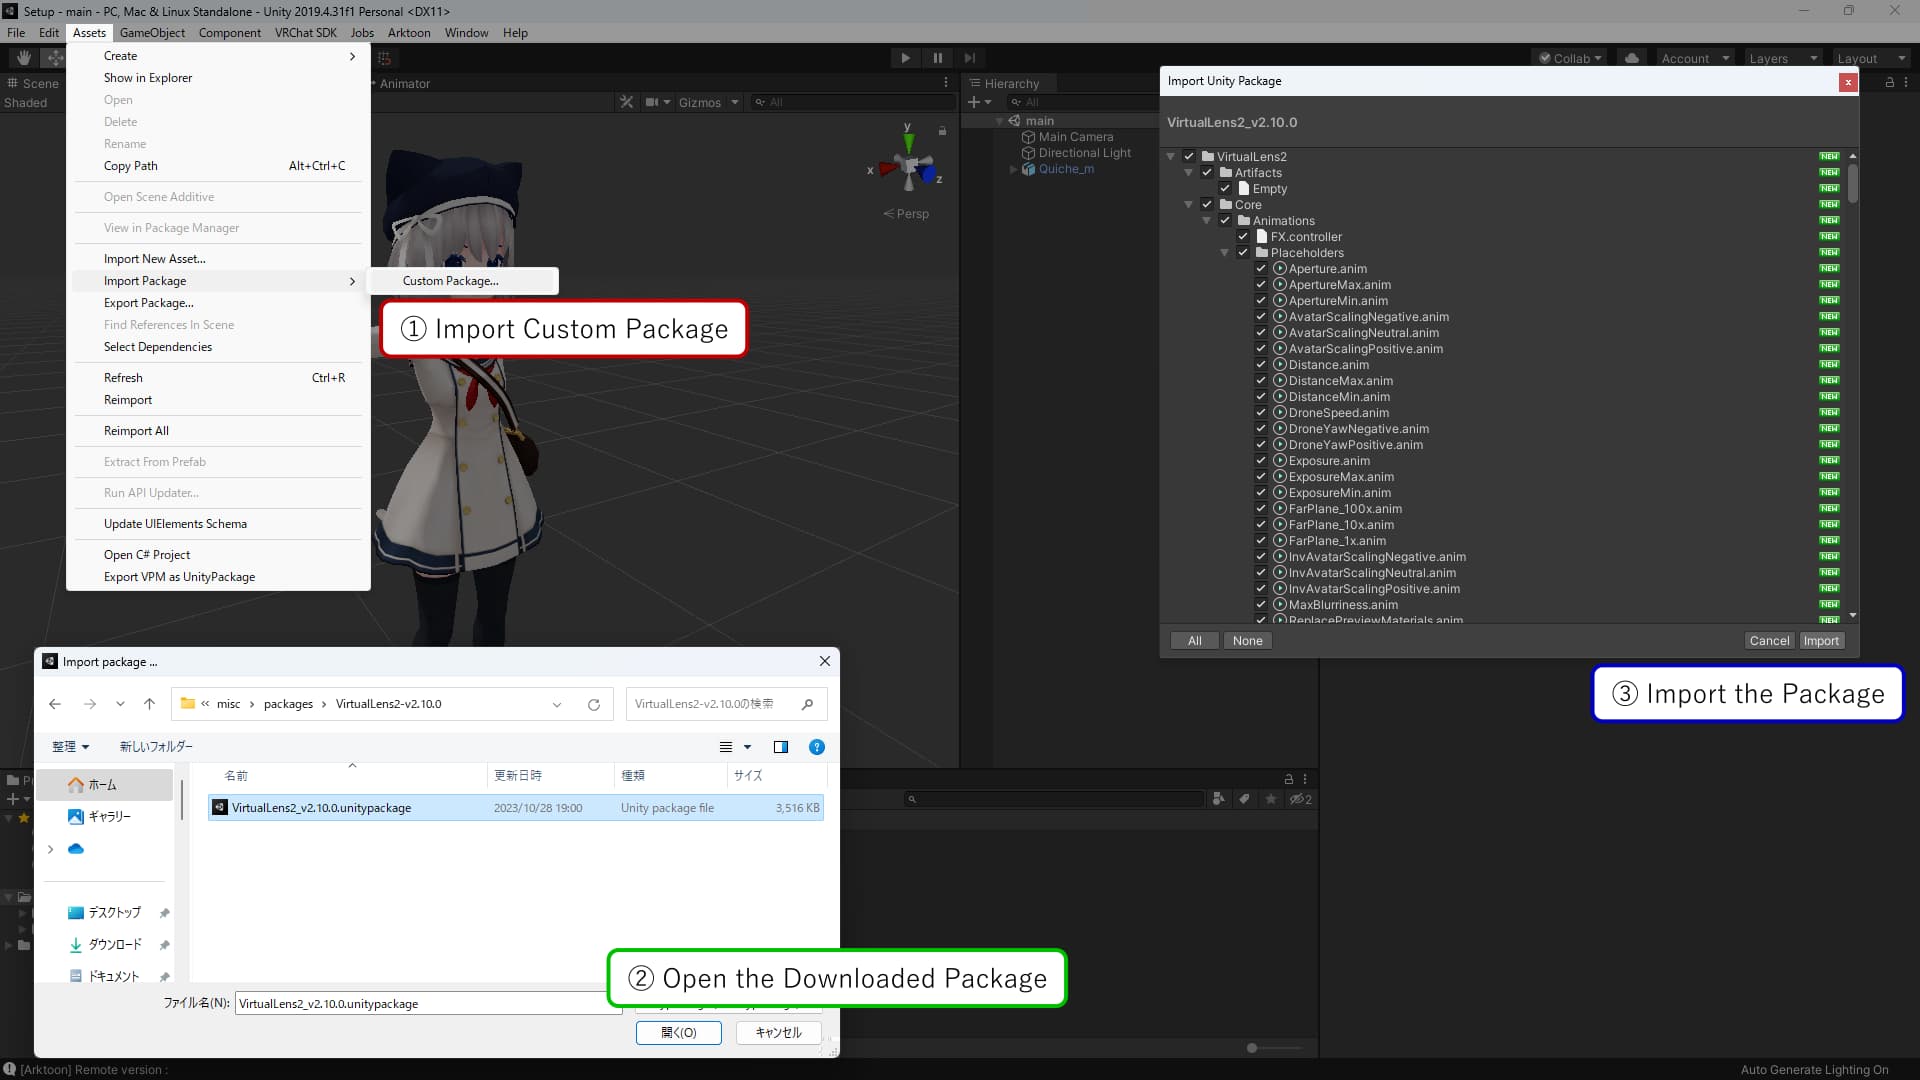
Import Unitypackage File
Import the downloaded package (VirtualLens2_v2.x.x.unitypackage) into your project.

Running Setup Helper
Select the avatar you want to set up, right-click, and choose “VirtualLens2” → “Non-Destructive Setup”. The setup helper will launch, so review the following settings and then press the “Apply” button.
| Avatar | The avatar you want to set up. |
|---|---|
| Target Hand | The hand that will hold the camera. |
| Settings Template | If set, it reads the configuration information from the VirtualLens Settings Prefab. (Optional) |
| Use Custom Model | Check this if you want to use a camera model other than the default. |
| Custom Model Prefab | Specify the Prefab for the camera model you want to place instead of the default model. If not set, the model placement will be skipped. |
| Keep Root Transform | Disables the automatic Transform adjustment feature when placing a custom model. |
Info
If the VRCSDK or Modular Avatar imported into the project is outdated, the menu items may not be displayed here. Please ensure that each package meets the requirements and update them as necessary.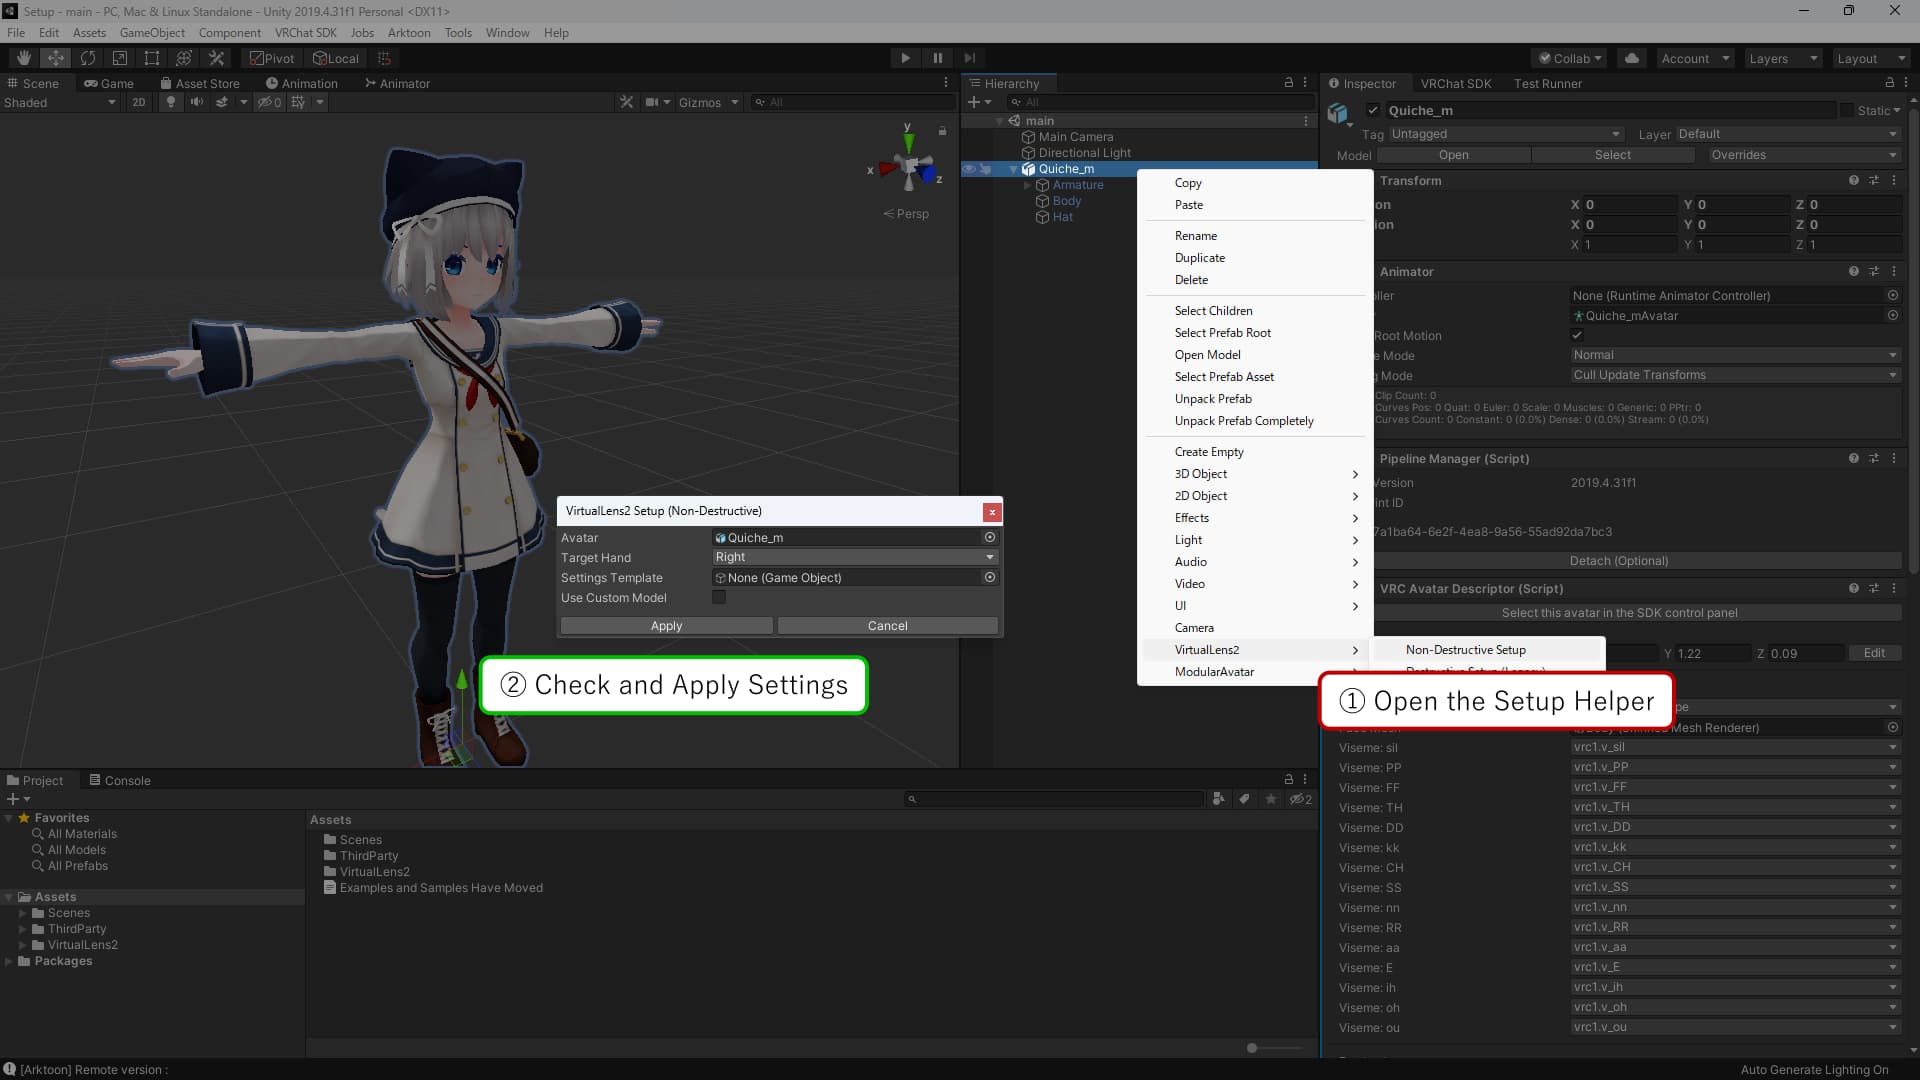
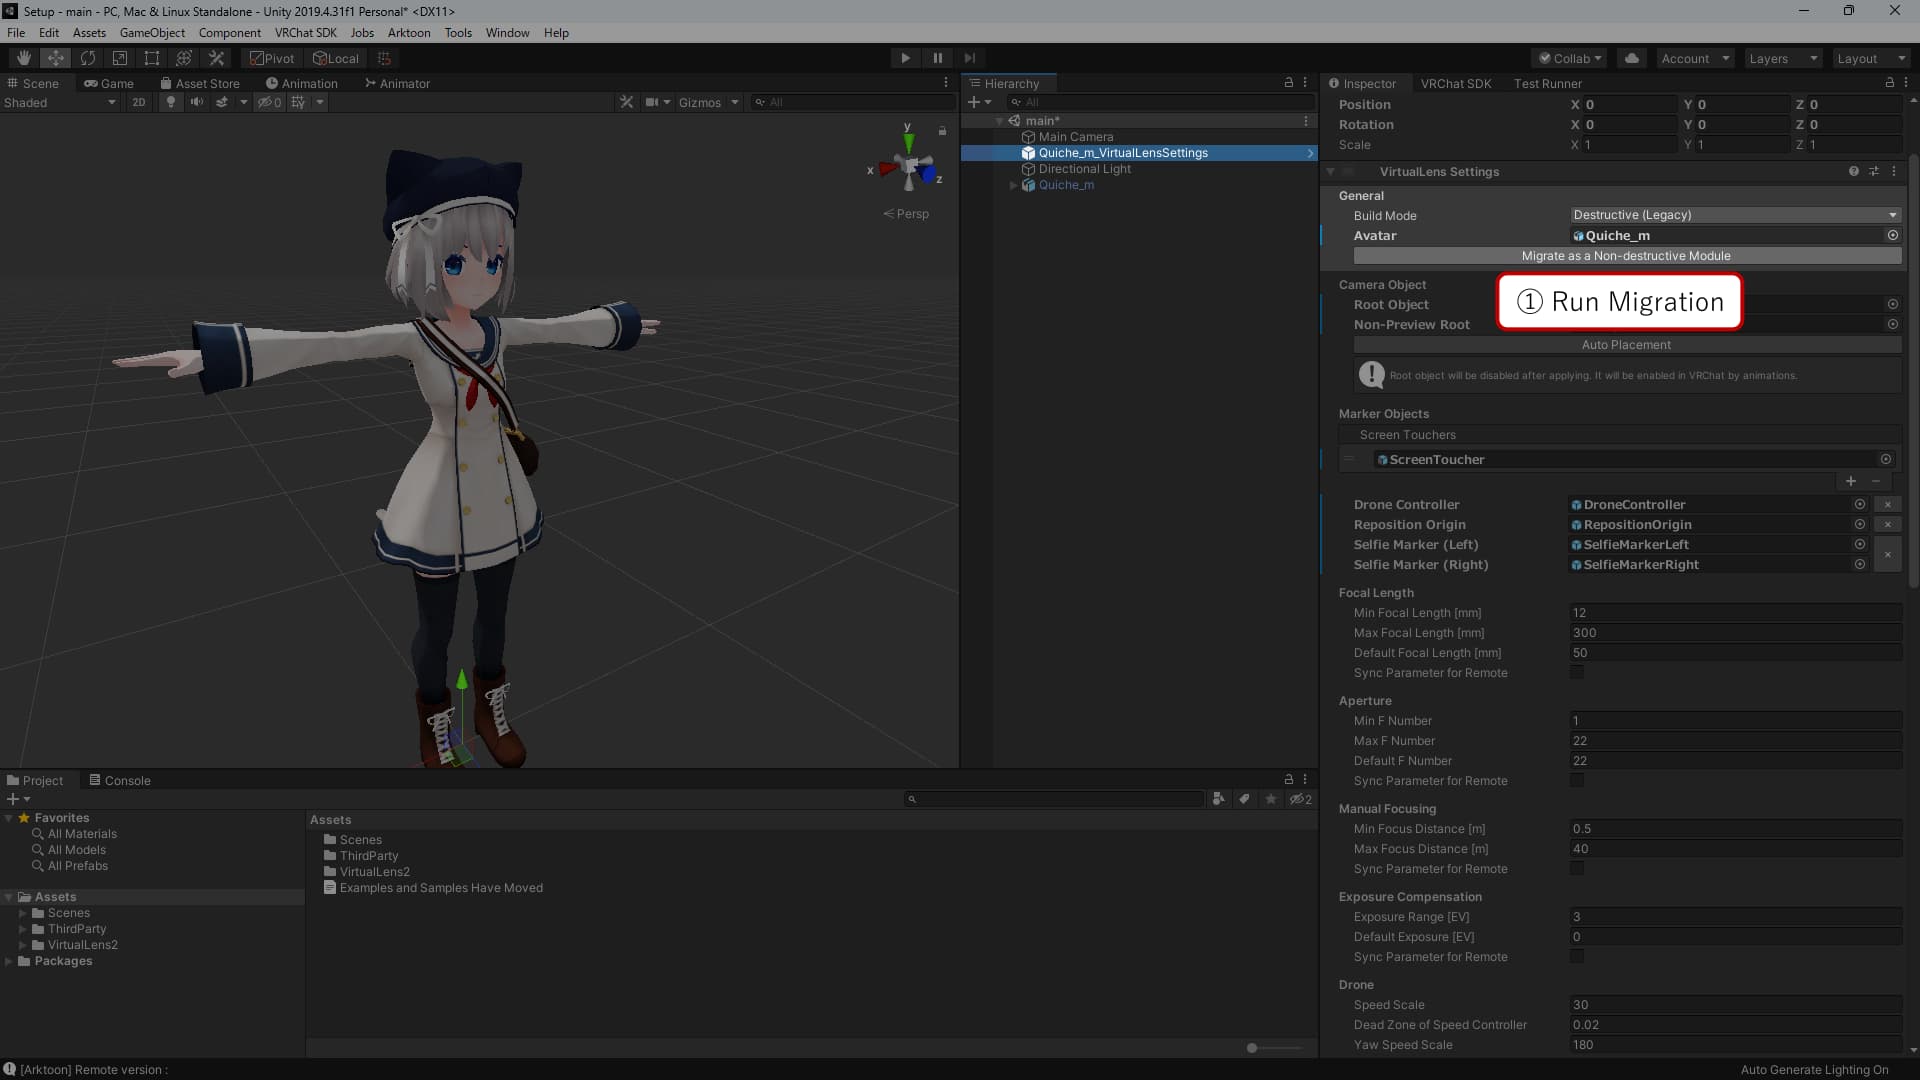
Placing the Camera Model
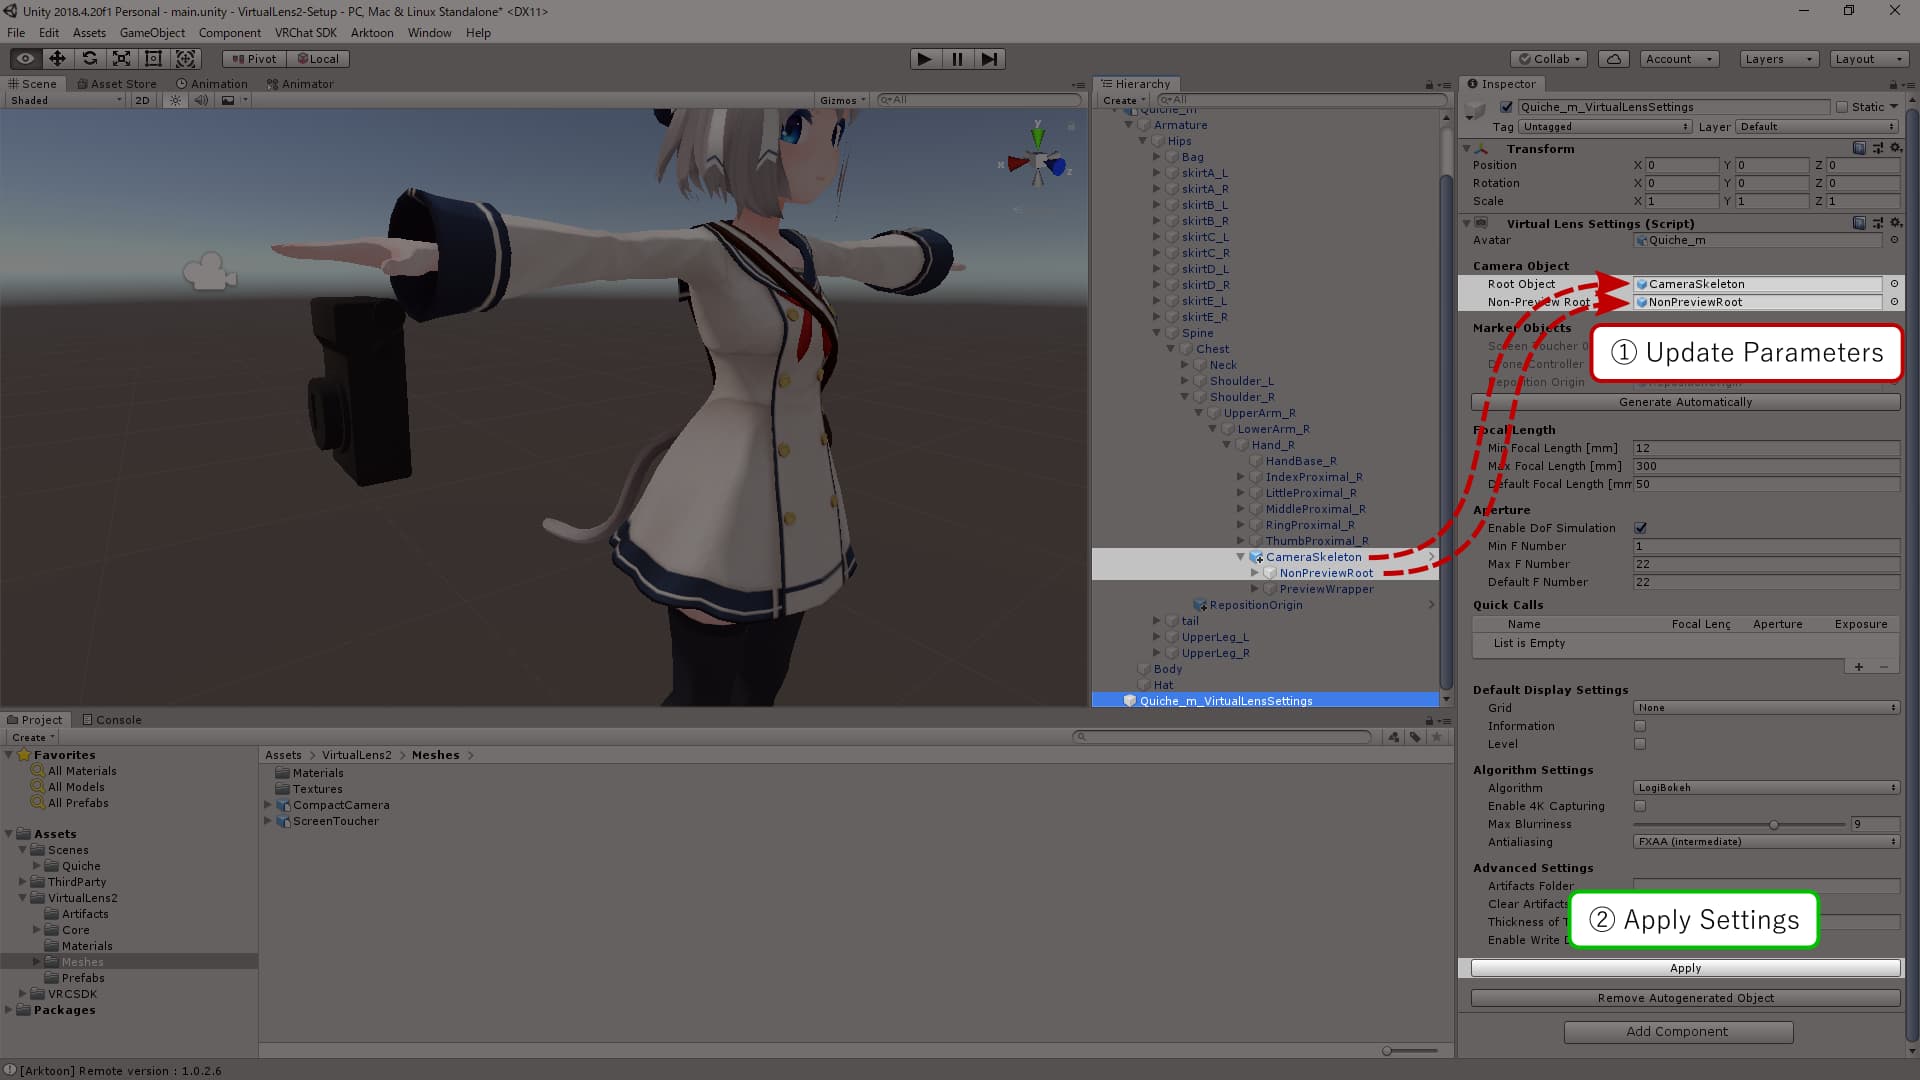
If the automatic placement of a camera model other than the default doesn’t work, you need to place the model manually. After adding the model to the scene, adjust its position and orientation. Move it to be a child of the bone you want the camera to follow. Additionally, you’ll need to enter information about the model into the VirtualLens Settings component. Refer to the image below and set the information below “Camera Object.”
Tips
If you find documentation for using a camera model with versions of VirtualLens2 prior to v2.5.5, adjust the items to set in “Optional Objects” to “Root Object” and those in “Droppable Objects” to “Non-Preview Root.”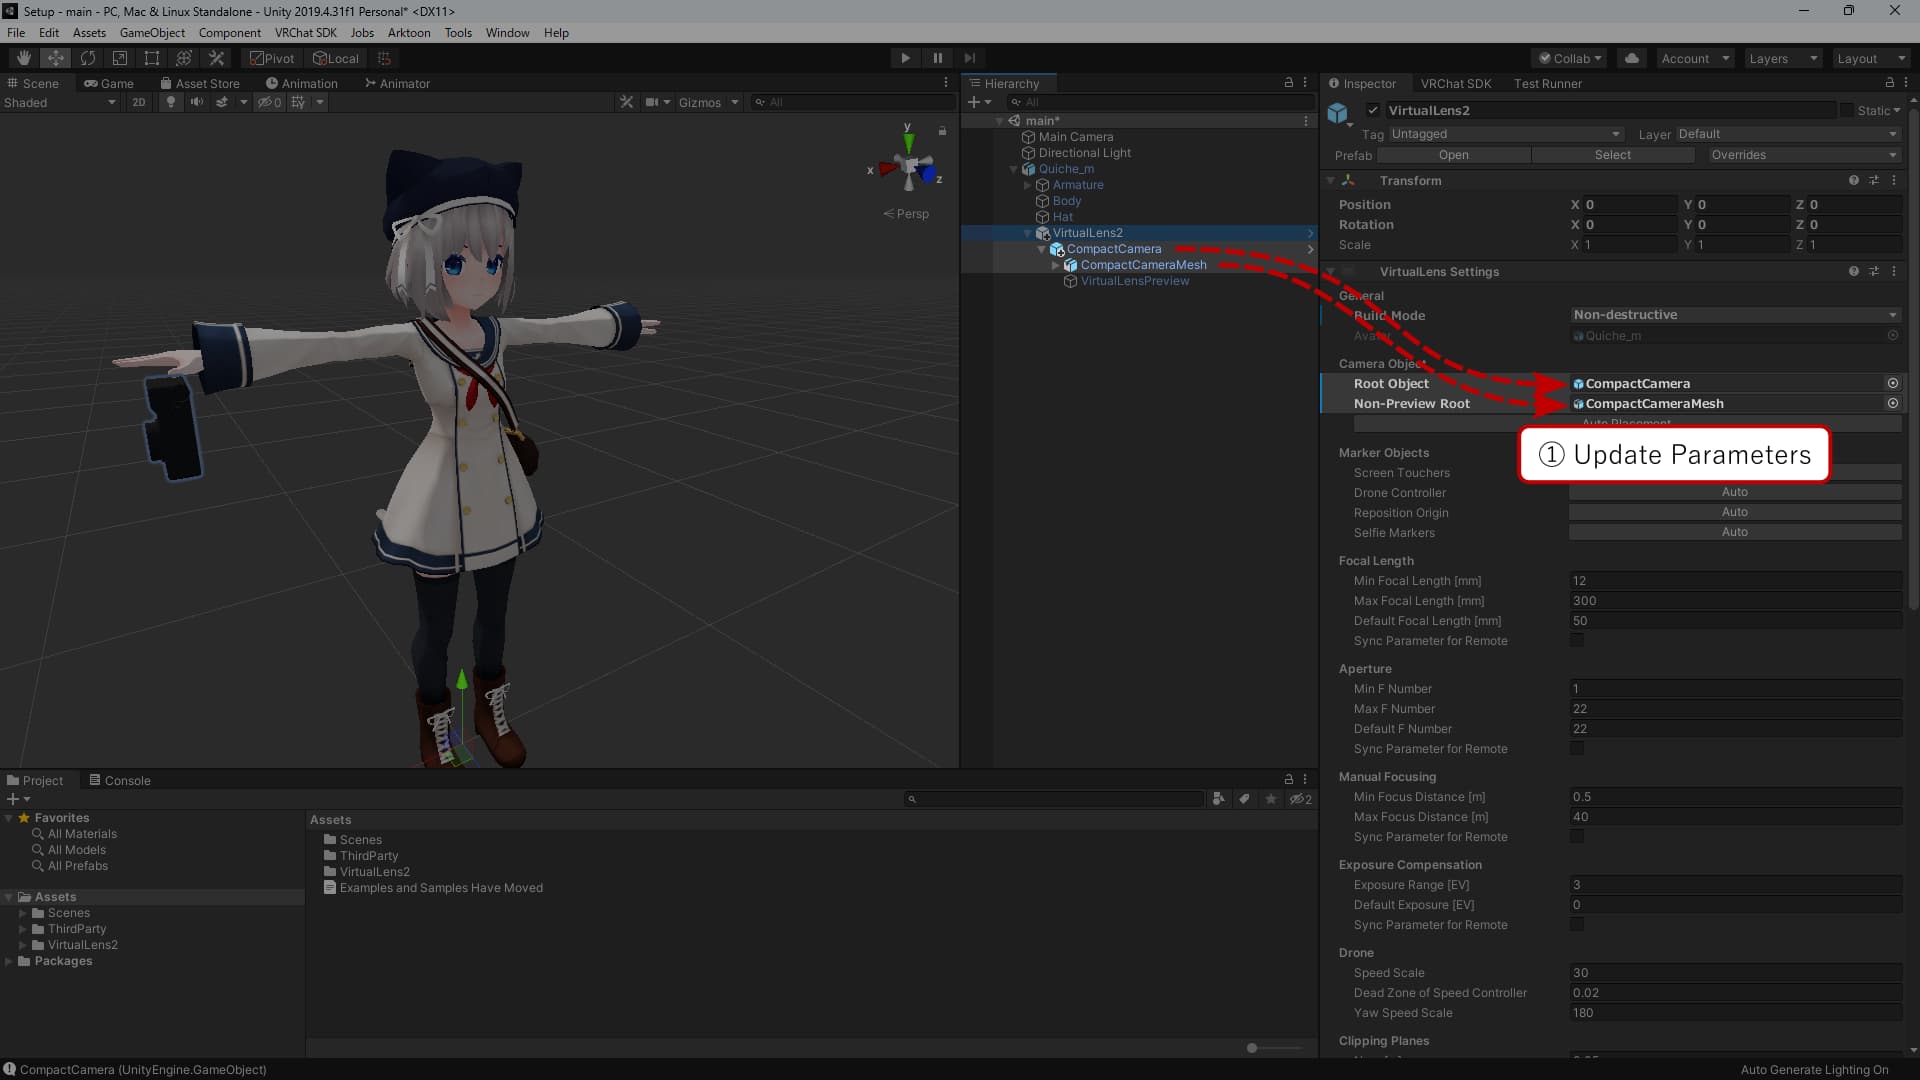
Uploading the Avatar
Now the setup of VirtualLens2 is complete. Upload your avatar and try using it.
Tips
If you want to capture images at resolutions other than FHD (1080p), such as 4K (2160p), consider setting the “Default Resolution" under “Algorithm Settings” in VirtualLens Settings to your preferred resolution.
For more details, please refer to the [High-Resolution Mode](/en/docs/configuration/high-resolution/) page.
1.2 - Shooting Guide
This guide explains the steps for taking photos using VirtualLens2.
Basic Usage
Preparing the Built-in Camera
From the menu, go to “Camera” → “Photo Camera” (or “Stream Camera” for video recording) and take out the built-in VRChat camera. If the focus feature is enabled, disable it beforehand to prevent interference.
Launching VirtualLens
-
 VirtualLens2
-
 Enable
Open the action menu and go to “Expressions” → “VirtualLens2” → “Enable” to launch VirtualLens2. While it’s active, the image seen in the built-in camera will be overridden with the one captured by VirtualLens. In this state, you can take and save photos captured by VirtualLens by triggering the shutter on the standard camera.
Tip
For still image photography, it’s advisable to hold the built-in camera with the hand that you won’t use for action menu operations. The camera displayed by VirtualLens2 simply follows the hand, so it’s possible to hold both the built-in camera and the VirtualLens2 camera with the hand that has the camera attached.1.3 - Upgrade Guide
This guide explains the update procedure for upgrading VirtualLens2 to a newer version.
Basic Steps
Importing the Unitypackage File
Import the Unitypackage file of the latest version that you downloaded (VirtualLens2_v2.x.x.unitypackage) to overwrite.
Reapplying Settings (For Destructive Setup Only)
Press the “Apply” button in the VirtualLens Settings component that was generated during the initial setup to update the data within your avatar.
Tip
This step is not necessary if you used the non-destructive setup. After importing the package, simply re-upload your avatar to apply the updates.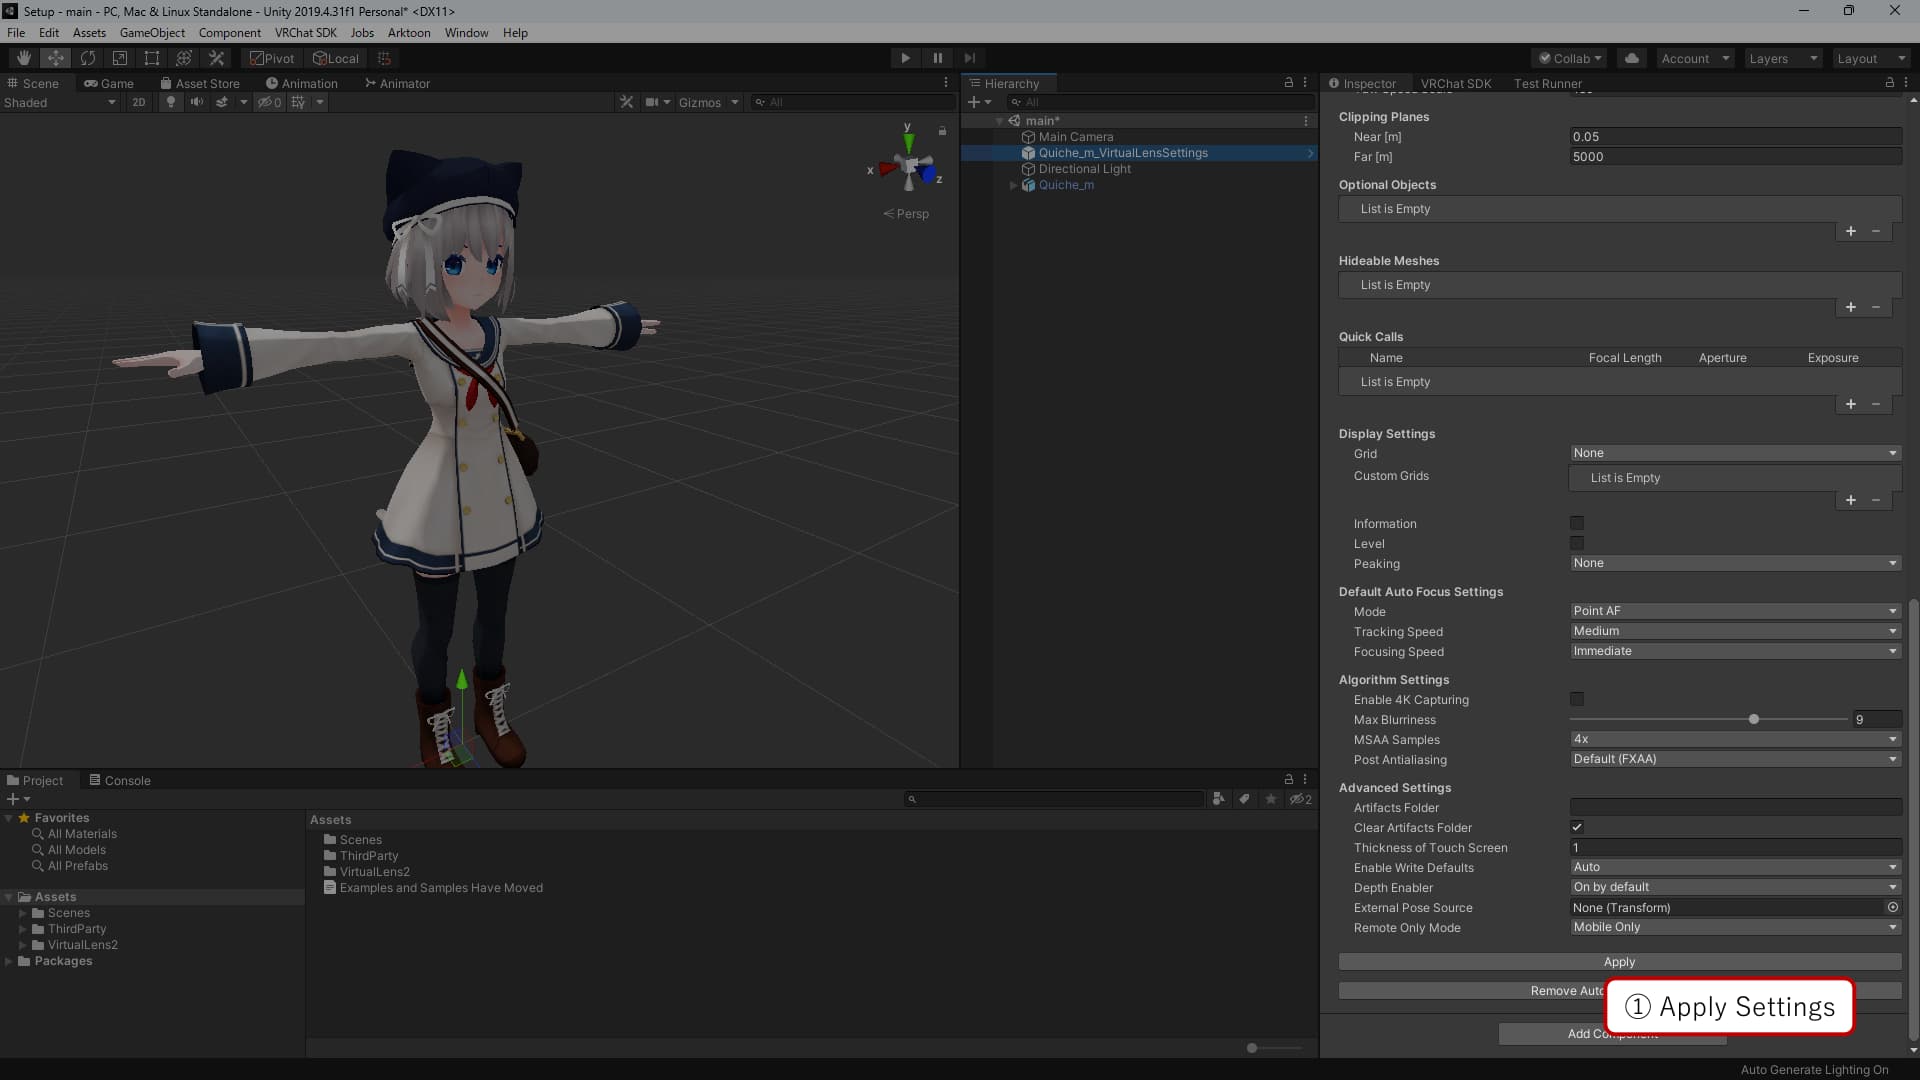
Version-Specific Steps
Updates from v2.10.4 or Earlier
Starting with VirtualLens2 v2.11.0, VRCSDK 3.7.0 or later is required. Additionally, this version of VRCSDK only supports Unity 2022. If your project is currently using Unity 2019, an upgrade to Unity 2022 will be necessary.
Updates from v2.9.9 or Earlier
Starting from VirtualLens2 v2.10.0, it is recommended to use the non-destructive setup. If you set up VirtualLens2 with a version earlier than v2.9.9, you can migrate to the non-destructive setup by importing Modular Avatar (version 1.8.0 or later) into your project and pressing the “Migrate as a Non-destructive Module” button in the VirtualLens Settings component.
Once you have migrated to the non-destructive setup, you won’t need to reapply settings for future updates.
Updates from v2.8.5 or Earlier
Starting from VirtualLens2 v2.9.0, default settings are provided through a prefab (VirtualLens2/Prefabs/DefaultSettings.prefab). The settings objects generated automatically by the setup helper in versions earlier than v2.8.5 are not instances of this prefab. To ensure that parameter adjustments in future updates are correctly reflected, it is recommended to replace the current settings objects with instances of the prefab.
To replace the settings objects, press the “Replace by Prefab Instance” button at the bottom of the VirtualLens Settings component to generate instances of the prefab with the current values, as needed.
2 - Feature List
This section explains the features available in VirtualLens2.
2.1 - Basic Features: Zoom, Aperture, Exposure
This section explains the settings for Zoom, Aperture, and Exposure.
Zoom
-
VirtualLens2
-
 Zoom
Zoom
Zoom controls the lens’s focal length (angle of view or magnification). The focal length can be adjusted within the range specified during setup, from “Min Focal Length” to “Max Focal Length.”

Aperture
-
VirtualLens2
-
 Aperture
Aperture controls the lens’s aperture size (F-number, depth of field). The F-number can be adjusted within the range specified during setup, from “Min F Number” to “Max F Number.” When the value is 0%, the blur effect from depth of field simulation is disabled.

Exposure
-
VirtualLens2
-
 Image Control
-
 Exposure
Exposure controls the brightness of the image. The exposure value can be adjusted within the range specified during setup, within the “Exposure Range.” When the value is set at 50%, there is no exposure compensation (0EV).

2.2 - Focus Control
This section explains the focus control features, including various autofocus modes and parameters, as well as manual focus.
Autofocus Modes
VirtualLens2 provides three autofocus modes:
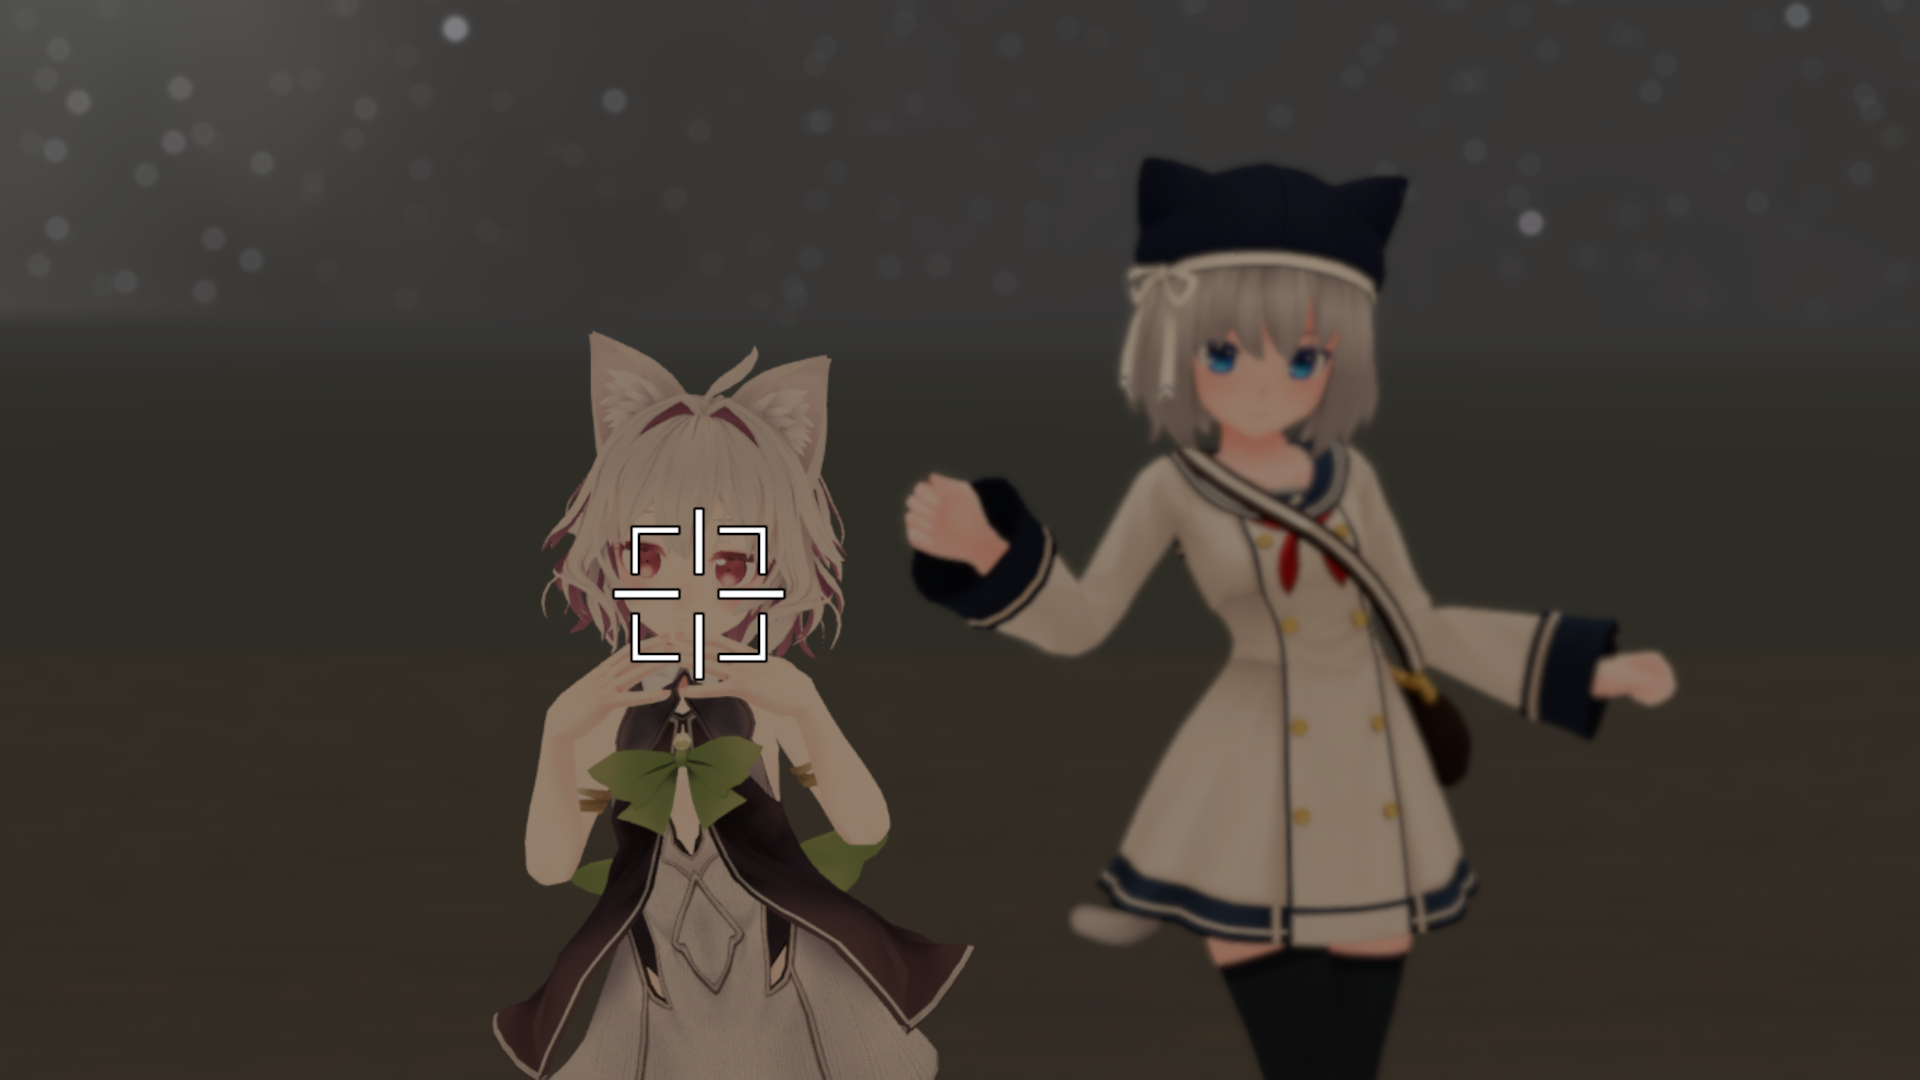
Point AF
-
VirtualLens2
-
Image Control
-
 Focus Control
-
AF Mode
-
 Point AF
In this mode, the focus adjusts to the point on the preview screen where the cursor is located. You can move this cursor by touching the preview screen with the index finger of the hand without the camera.
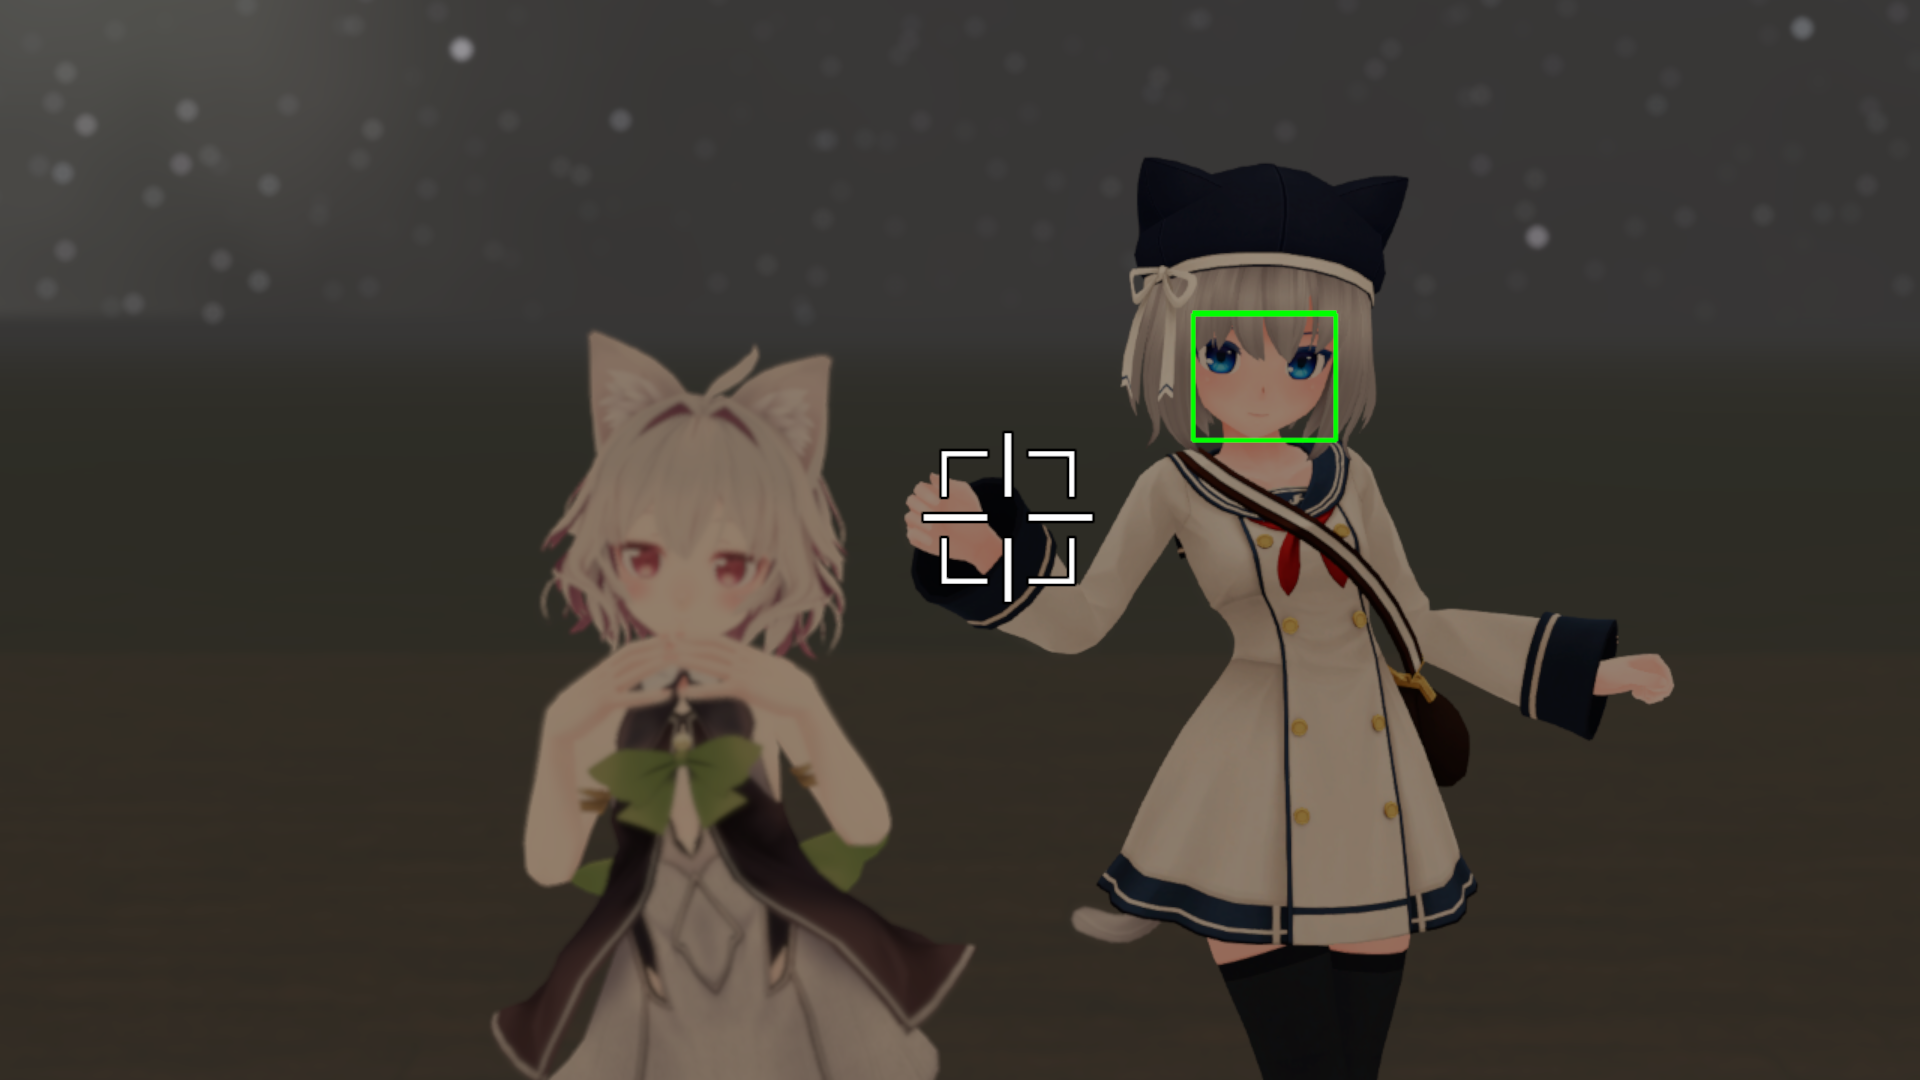
Face AF
-
VirtualLens2
-
Image Control
-
Focus Control
-
AF Mode
-
 Face AF
Face AF detects and focuses on the avatar’s face or eyes in the current image. If there are multiple faces in the frame, you can select which face to focus on by touching the preview screen with your index finger.
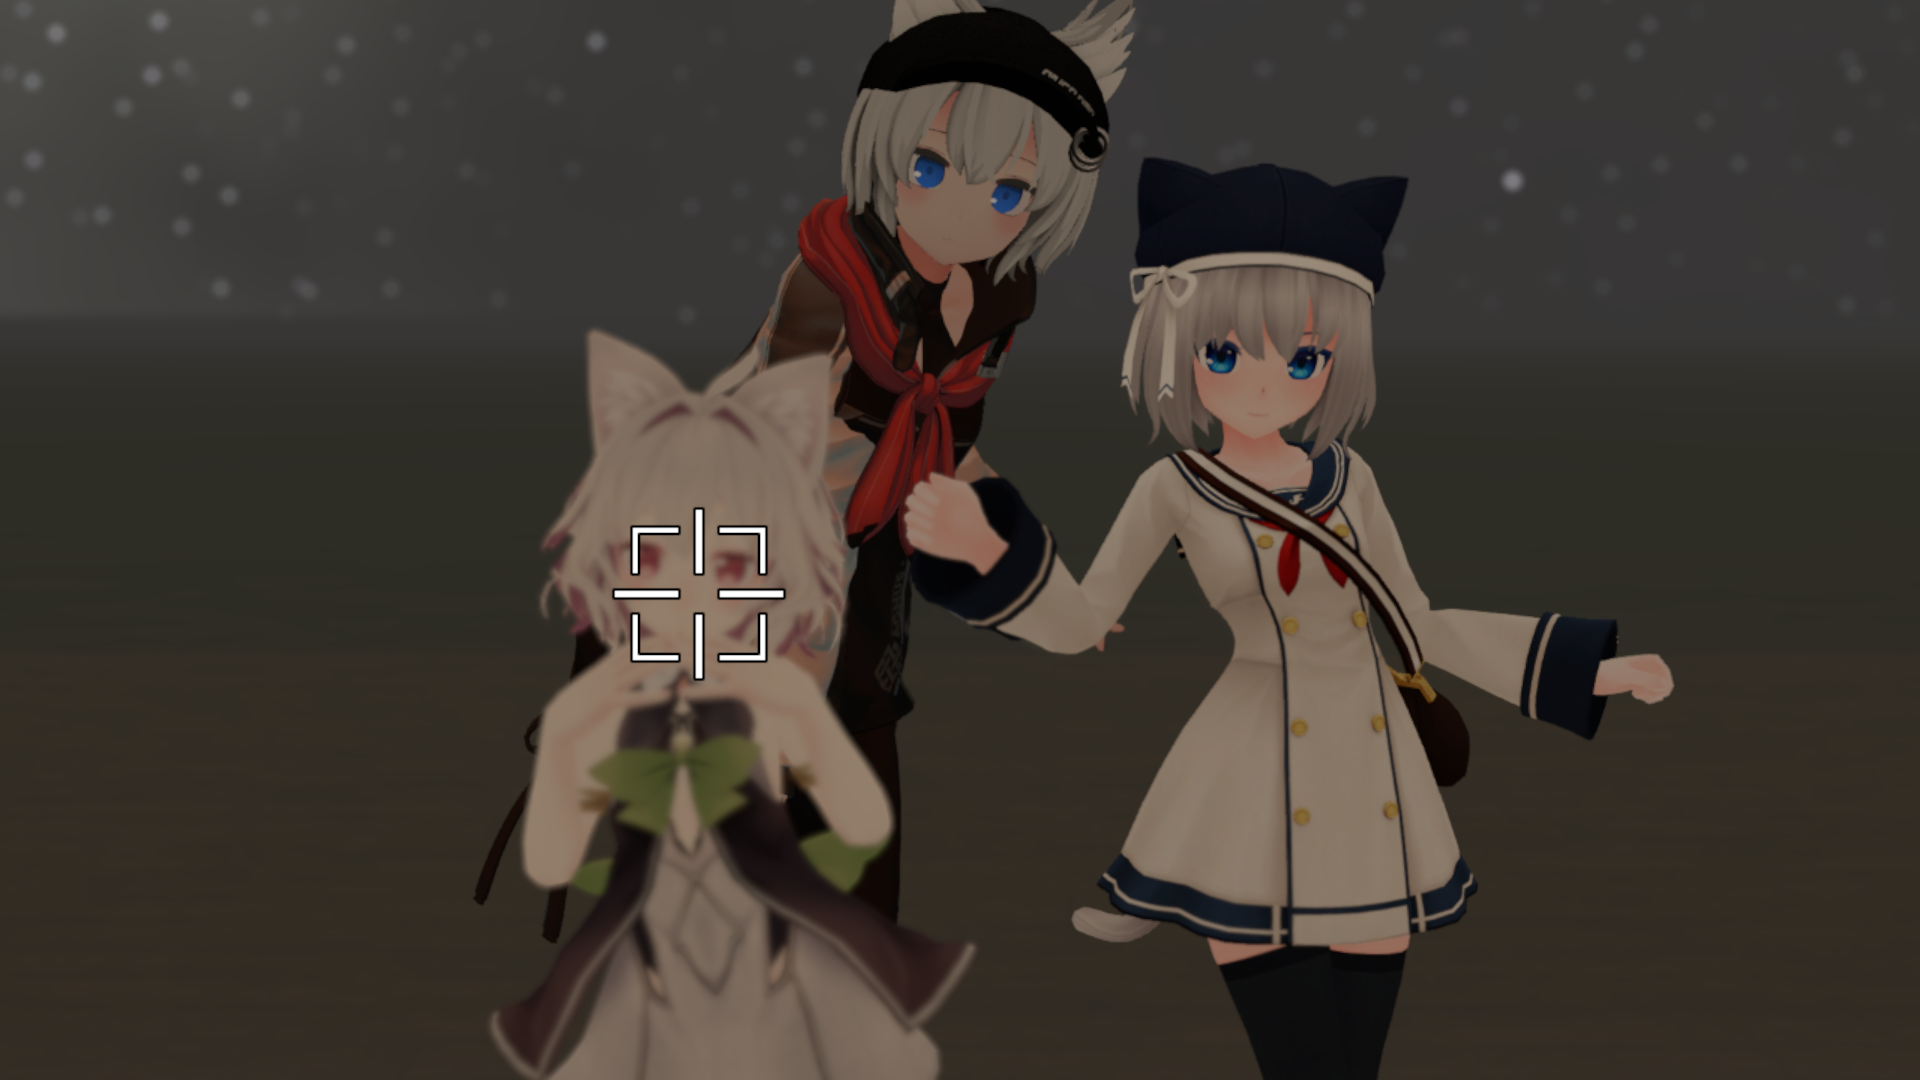
Selfie AF
-
VirtualLens2
-
Image Control
-
Focus Control
-
AF Mode
-
 Selfie AF
Selfie AF focuses on the eyes of the person taking the photo. It is a lightweight and stable option compared to Face AF, making it ideal for use when there is no need to focus on other players.
Autofocus Parameters
Face Detection Switching Speed
-
VirtualLens2
-
Image Control
-
Focus Control
-
 Tracking Speed
When using Face AF, if the detection of the tracked face fails, the system will attempt to switch focus to a nearby face from the last detected point. This parameter controls the speed at which the system expands the search range to find a new tracking target.
Increasing the speed reduces the time during which there is no focus on any subject in situations with frequent changes in subjects. However, it may lead to unintentional changes in focus to different individuals if the face detection is unstable. Conversely, decreasing the speed ensures stable focus even with unstable face detection, but it takes more time for the system to switch to a new subject automatically.
Focus Adjustment Speed
-
VirtualLens2
-
Image Control
-
Focus Control
-
 Focusing Speed
This parameter adjusts the speed at which the point where the autofocus sets the focus moves. Slowing down this speed results in a gradual change in distance to the focus plane over time.
Manual Focus
-
VirtualLens2
-
Image Control
-
 Manual Focusing
For manual focus, set the distance to the focal plane. The adjustable range can be configured during setup, within the “Min Focus Distance” to “Max Focus Distance” range. When this parameter is set to 0%, autofocus is used.
2.3 - Position and Orientation Control
This section explains the features for controlling the position and orientation of the camera, especially useful for drone-like camera control.
Auto Horizon Leveling
-
VirtualLens2
-
 Transform Control
-
 Auto Leveler
Auto Horizon Leveling cancels out roll rotation of the camera, ensuring it remains horizontally or vertically aligned. If Auto Snap is selected, it snaps the rotation in 30-degree increments.
Stabilization
-
VirtualLens2
-
Transform Control
-
 More
More
-
 Stabilizer
Stabilization minimizes the impact of small tremors by gently modulating the camera’s movements and rotations. Enabling stabilization will replace the camera model with an alternative model to prevent reflections.
Fix to World Space
-
VirtualLens2
-
Transform Control
-
 Drop/Reposition
Fixing the camera to the world space prevents it from following your hand movements.
Reposition
-
VirtualLens2
-
Transform Control
-
Drop/Reposition
Reposition mode allows the camera, which is fixed in the world space, to be moved manually. In this mode, the camera follows your hand movements as if you were physically near the camera.
Reposition Movement Scaling
-
VirtualLens2
-
Transform Control
-
More
-
Reposition Scale
In reposition mode, you can scale the camera’s movement based on your hand movement. The scaling factor can be set to 1x, 3x, 10x, or 30x. When set to 1x, the camera moves exactly as your hand moves.
Camera Retrieval
-
VirtualLens2
-
Transform Control
-
 Pickup
Camera retrieval mode brings back the camera to your hand when it is fixed in the world space, repositioning, or any other state.
Save and Load Camera Positions
-
VirtualLens2
-
Transform Control
-
More
-
 Pins
Pins
You can store up to four different camera positions and recall them later. To record the current camera position, press and hold Action Menu’s Pin [1-4] button for more than 1 second. To recall a stored position, press the corresponding Pin [1-4] button briefly to move the camera to the recorded location and fix it in the world space.
Drone Mode
-
VirtualLens2
-
Transform Control
-
 Drone
Drone
Drone mode allows you to control the camera as if it were a drone. To enter drone mode, slightly extend both hands in front of you and select the Drone mode option from the Action Menu. In this mode, 2D Puppet opens, and you can control the camera’s orientation with the direction of your hand which was the camera attached and the left-right input of 2D Puppet. The direction and speed of camera movement are controlled using the gizmo and the white ball appearing at your hand’s location. Zoom control is managed by the up-down input of the 2D Puppet. The white ball constantly follows the controller hand and moves further away from the gizmo’s center to increase the movement speed. Additionally, by quickly flicking the stick left or right twice with the 2D Puppet, the drone’s orientation can be rotated by 180 degrees.
To exit Drone Mode, press the trigger button to close 2D Puppet. The camera will return to a fixed position in the world space.
Tip
If you find the drone’s movement too fast or too slow, you can adjust the speed based on your setup parameters. Refer to the configuration reference for details.Quick Selfie
-
VirtualLens2
-
Transform Control
-
More
-
 Quick Selfie
Reverses the camera’s orientation to face the photographer. The larger the value, the further the camera position will be. To revert, retrieve the camera using Pickup.
2.4 - Other Features
This section covers additional features of VirtualLens2.
Preset Recall
-
VirtualLens2
-
 Quick Calls
You can recall preset settings that you prepared during setup. This allows you to quickly configure commonly used values for focal length, aperture, exposure, or a combination of these. For more details about preset settings, refer to the Configuration Reference.
Hide Specified Meshes
-
VirtualLens2
-
 Advanced Settings
-
 Mesh Visibility
You can hide specified meshes, which you set up during the configuration. Hiding these meshes affects all other players, but it won’t work if safety settings have disabled animations.
Preview Screen Info Display Settings
You can configure the information displayed on the preview screen. To change the default settings, adjust the parameters during setup.
Grid
-
VirtualLens2
-
Advanced Settings
-
 Display Settings
-
 Grid
Grid
This option lets you display gridlines on the preview screen. You can choose between options such as Hidden, 3x3, 3x3 with Diagonals, 6x4, or a Custom Grid.
Configuration Info
-
VirtualLens2
-
Advanced Settings
-
Display Settings
-
 Information
This setting displays values like focal length, aperture, etc., in common units rather than percentage notation.
Level
-
VirtualLens2
-
Advanced Settings
-
Display Settings
-
 Level
Level
It shows a visual level that indicates the camera’s tilt.
Focus Peaking
-
VirtualLens2
-
Advanced Settings
-
Display Settings
-
 Peaking
Focus peaking highlights the area in focus. You can choose to enable this feature at all times, only in manual focus mode, or disable it.
Mask Settings
-
VirtualLens2
-
Advanced Settings
-
 Mask
Mask
When shooting with VirtualLens2, you can select which objects should be visible through the camera.
Local Player
-
VirtualLens2
-
Advanced Settings
-
Mask
-
 Local Player
Choose whether to display the shooter’s own avatar.
Remote Players
-
VirtualLens2
-
Advanced Settings
-
Mask
-
 Remote Player
Choose whether to display avatars of other players.
UI Elements
-
VirtualLens2
-
Advanced Settings
-
Mask
-
 UI
UI
You can select whether to show UI elements like nameplates and personal mirrors on the camera feed.
Preview HUD
-
VirtualLens2
-
Advanced Settings
-
 Preview HUD
This feature prominently displays the preview screen at the center of your view.
Internal Resolution Settings
-
VirtualLens2
-
Advanced Settings
-
 Resolution
Select the resolution for images used internally by VirtualLens2. It is recommended to match this setting with the resolution set on the VRChat standard camera.
Dealing with Scene-Dependent Issues
The constraints imposed by avatars incorporating cameras can lead to unexpected behavior depending on the world and instances. In such cases, VirtualLens2 includes options to address these issues, albeit with some trade-offs in performance or usability.
Clipping Plane Adjustment
-
VirtualLens2
-
Advanced Settings
-
 Workarounds
-
 Far Plane
Temporarily relaxes the far clipping plane limit. If distant objects are not being captured in extremely large worlds, try adjusting this setting.
However, unnecessarily increasing this limit may lead to increased rendering load and visual artifacts such as Z-fighting. Please be mindful of these issues when making adjustments.
Configuration Options
- Default: Uses the Far Plane value specified during setup as the upper limit.
- 10x: Uses 10 times the specified Far Plane value as the upper limit.
- 100x: Uses 100 times the specified Far Plane value as the upper limit.
Technical Background
In VRChat, the maximum rendering distance for a player’s view or the built-in camera is determined by the world settings. However, since avatar-integrated cameras cannot reference world settings, VirtualLens2 applies a predefined limit (default: 5000m) as the upper boundary.
Arbitrarily increasing this value can lead to visual degradation due to precision loss, but some worlds require greater viewing distances. This feature allows users to temporarily adjust the limit, balancing both needs.
Enable Depth Texture Generation
-
VirtualLens2
-
Advanced Settings
-
Workarounds
-
 Depth Enabler
Forces the generation of depth textures during VirtualLens2 capture to stabilize the operation of visual effects that depend on them.
Configuration Options
- Disable: Does not force depth texture generation.
- Enable: Forces depth texture generation. (Default setting)
Technical Background
Some worlds utilize custom shaders for special visual effects that rely on depth textures (_CameraDepthTexture). If depth textures are not generated, the expected visual results may not be achieved. This feature enables a faint directional light to ensure that depth textures are generated even for avatar-integrated cameras, improving effect stability within VirtualLens2.
However, if certain objects in a scene are highly affected by weak lighting, their appearance may change significantly. In such cases, temporarily disabling this setting is recommended.
Filling Depth Textures
-
VirtualLens2
-
Advanced Settings
-
Workarounds
-
 Depth Cleaner
Reduces the impact of effects that use depth textures (_CameraDepthTexture) on the built-in camera by clearing the depth texture with a uniform value during built-in camera rendering.
Configuration Options
- Disable: Does not clear the depth texture of the standard camera.
- Nearest: Clears the standard camera’s depth texture using its Near Plane value.
- Farthest: Clears the standard camera’s depth texture using its Far Plane value. (Default setting)
Technical Background
Some worlds apply post-processing effects such as depth-of-field simulation and Screen-Space Ambient Occlusion, which rely on depth textures (_CameraDepthTexture). If these effects use depth textures captured from the built-in camera’s viewpoint, unintended artifacts may appear.
This feature minimizes such unintended effects by filling the depth texture with a uniform value, rendering these effects largely ineffective, and thus reducing their impact on the output.
3 - Configuration Reference
This section explains the settings you can configure during the setup of VirtualLens2.
3.1 - List of Configuration Parameters
This is a list of customizable settings for the setup of VirtualLens2.
The VirtualLens Settings component generated automatically during setup contains various parameters. By modifying these parameters and reapplying them, you can customize the behavior of VirtualLens2 to a certain extent.
General Settings
Build Mode
Choose whether to use non-destructive editing or destructive editing during the setup of VirtualLens2.
Avatar
Configure the avatar to be set up. It must have a VRCAvatarDescriptor component and be set up as a humanoid avatar. When using the non-destructive workflow, the avatar included in the object containing that VirtualLens Settings component will be the one set up.
Camera Object Settings
Camera Mesh Settings (Root Object, Non-Preview Root)
Configure the settings for the camera object displayed at hand when using VirtualLens2. For more details, refer to Replacing the Camera Model.
Auto Placement
Re-run the automatic placement of the camera mesh. This can be useful for resetting the placement or replacing the camera model later.
Marker Objects
Select objects used as reference points for position and orientation in various functions. You can customize related behaviors by adjusting the positions of these objects as needed.
Screen Touchers
These are objects used for touch screen hit detection. Normally, they are placed at the tip of the index finger of the hand without the camera.
Drone Controller
This is an object indicating the position for displaying the controller used to control speed in drone mode. It is usually located near the palm of the hand without the camera.
Reposition Origin
This is an object indicate the position corresponding to the point before the repositioning when using the repositioning mode. It is usually placed slightly in front of the chest.
Selfie Markers
These are objects representing the points to focus on when using the selfie autofocus. They are usually placed near the pupils of each eye.
Settings for Continuous Value Parameters
Focal Length
Set the upper and lower limits and default values of the focal length in values equivalent to full-frame sensors (35mm format).
| Min Focal Length [mm] | Set the lower limit of the focal length. |
|---|---|
| Max Focal Length [mm] | Set the upper limit of the focal length. |
| Default Focal Length [mm] | Set the default focal length value. |
| Sync Parameter for Remote | Synchronize the focal length parameter with remote players. |
Aperture
Set whether to implement depth of field simulation, and the upper and lower limits and default values for the aperture size in terms of F-stop.
| Enable DoF Simulation | Set whether to implement depth of field simulation. |
|---|---|
| Min F Number | Set the lower limit of the F-number (wide-open aperture value). |
| Max F Number | Set the upper limit of the F-number. |
| Default F Number | Set the default F-number. If it is equal to Max F Number, depth of field simulation is disabled. |
| Sync Parameter for Remote | Synchronize the F-number parameter with remote players. |
Manual Focusing
Set whether to implement manual focusing, and the range of distances that can be focused on in meters.
| Enable Manual Focusing | Set whether to implement manual focusing. |
|---|---|
| Min Focus Distance [m] | Set the minimum shooting distance when using manual focusing. |
| Max Focus Distance [m] | Set the maximum shooting distance when using manual focusing. |
| Sync Parameter for Remote | Synchronize the focus distance during manual focusing with remote players. |
Exposure Compensation
Set whether to implement exposure compensation and the range and default value for the compensation value in EV (exposure value).
| Enable Exposure Compensation | Set whether to implement exposure compensation. |
|---|---|
| Exposure Range [EV] | Set the range of exposure compensation values. |
| Default Exposure [EV] | Set the default exposure compensation value. |
| Sync Parameter for Remote | Synchronize the exposure compensation value with remote players. |
Drone Function
Set whether to implement the drone function and configure parameters such as speed.
| Enable Drone | Set whether to implement the drone function. |
|---|---|
| Speed Scale | Adjust the speed of the drone. The amount of movement per second is determined by multiplying this value by the input from the controller. |
| Dead Zone of Speed Controller | Set the radius in meters at which input speed from the controller is considered to be zero. |
| Yaw Speed Scale | Set the speed of rotation caused by left and right directional input in 2D puppet mode. This value determines the angle change per second when the input is at maximum. |
| Enable Quick Turn | Toggle the quick turn feature on or off. |
| Enable Zoom Control | Toggle the zoom control via the up-down input of the 2D Puppet on or off. |
Clipping Planes
Set the range of the camera used by VirtualLens2 for shooting.
Control of External Objects
Optional Objects
Set objects that are enabled or disabled in conjunction with VirtualLens2. If the checkbox is enabled, the objects are enabled when VirtualLens2 is enabled and disabled when it is disabled. If the checkbox is disabled, the opposite occurs.
Hideable Meshes
Set objects for controlling visibility using the mesh hiding feature. If the feature is enabled, the enabled or disabled state of MeshRenderer or SkinnedMeshRenderer components in the specified objects will be controlled.
Calling Presets (Quick Calls)
Set up to 8 presets that can be called using the preset feature. Only the checked items for focal length, aperture, and exposure compensation will be updated to the specified values.
Display Settings for the Preview Screen
Changing Default Settings (Grid, Information, Level, Peaking)
Configure the items to be displayed on the preview screen by default. Each item and its value corresponds to the settings for preview screen information display.
カスタムグリッドの設定 (Custom Grids)
Register up to four images that can be used instead of a grid. It is recommended that the images meet the following requirements:
- Have opacity in the alpha channel (enable “Alpha is Transparency”)
- Have a resolution of 1280x720
- Disable automatic resizing to power-of-2
- Do not generate mip maps
You can refer the example (VirtualLens2/Textures/CustomGrid_Example.png) in the package.
Auto Focus Settings
Change the default settings for auto focus. Each item and its value correspond to the auto focus mode and parameters settings.
Settings for Image Processing Algorithms
Configure settings related to image quality and performance, such as parameters for depth of field simulation.
| Enable 4K Capturing | If checked, enable 4K capturing. |
|---|---|
| Max Blurriness | Set the maximum blur radius for depth of field simulation. |
| MSAA Samples | Set the MSAA sample count. Increasing this value will smooth out polygon edges at the cost of higher performance load. |
| Post Antialiasing | Choose the algorithm for anti-aliasing applied as post-processing. |
| Realtime Post Antialiasing | Choose the anti-aliasing algorithm used for rendering the preview screen when 4K capturing mode is enabled. |
Advanced Settings
| Artifacts Folder | (Destructive setup only) Specify the folder where automatically generated files will be saved during setup. If left empty, a folder will be created automatically. |
|---|---|
| Clear Artifacts Folder | (Destructive setup only) If enabled, clears the contents of the Artifacts Folder during setup. |
| Thickness of Touch Screen | Adjust the thickness of the touch detection on the preview screen. A larger value increases the detection range. |
| Enable Write Defaults | If enabled, automatically generated Animator State's Write Defaults will be enabled. |
| Depth Enabler | Set whether to the enabling depth texture feature by default. |
| External Pose Source | Set the object referenced when using the external pose input feature. |
| Remote Only Mode | (Non-destructive setup only) Set up only the necessary functions for displaying avatars from other players when VirtualLens2 is enabled, omitting features like photography. |
Settings for Modular Avatar Integration
This is displayed only when you are using a destructive setup while the Modular Avatar is imported into the project. For more details, also refer to Integration with Modular Avatar (Legacy).
| Enable Modular Avatar Integration | If enabled, use Modular Avatar to apply changes to the avatar. |
|---|
3.2 - Replacing the Camera Model
This document provides information on replacing the 3D model used when using VirtualLens2.
Using VirtualLens2-Compatible Prefabs
If the package of the 3D model you want to use includes VirtualLens2-compatible prefabs, please refer to the documentation provided with the model data and setup guide. If the Prefab contains objects named VirtualLensOrigin and VirtualLensPreview, it is likely compatible with VirtualLens2.
Simple Replacement Procedure
Here, we’ll explain the procedure for displaying a 3D model as a camera when there are no VirtualLens2-compatible prefabs or setup instructions available. If you wish to create a prefab for sharing with other avatars or distribute a pre-configured mesh, please refer to the more detailed instructions below.
Preparations
If there is a default camera model, remove CompactCamera from the Hierarchy.
Placing the Template Prefab
Add VirtualLens2/Prefabs/CameraSkeleton.prefab to the scene.
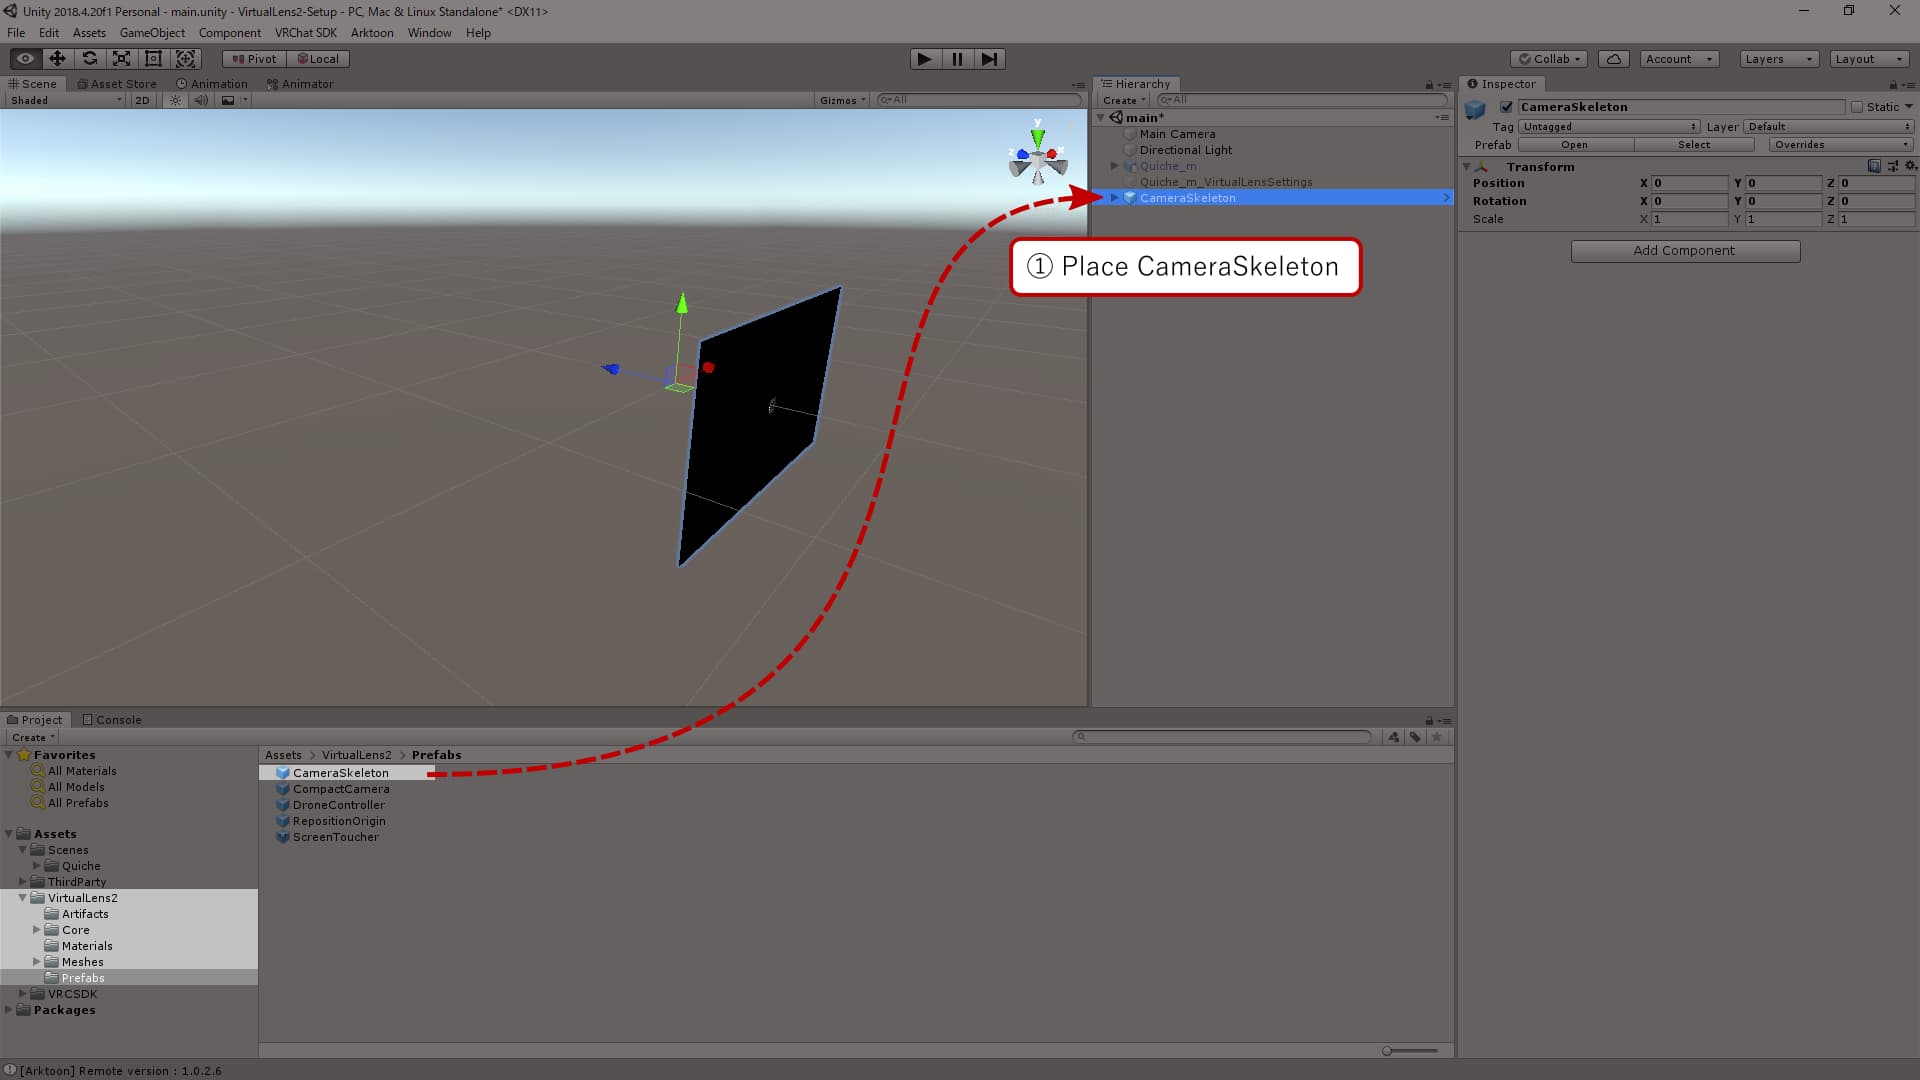
Placing Custom Mesh
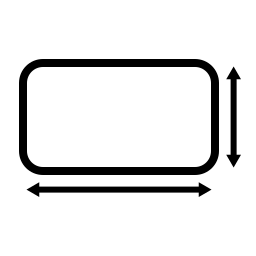
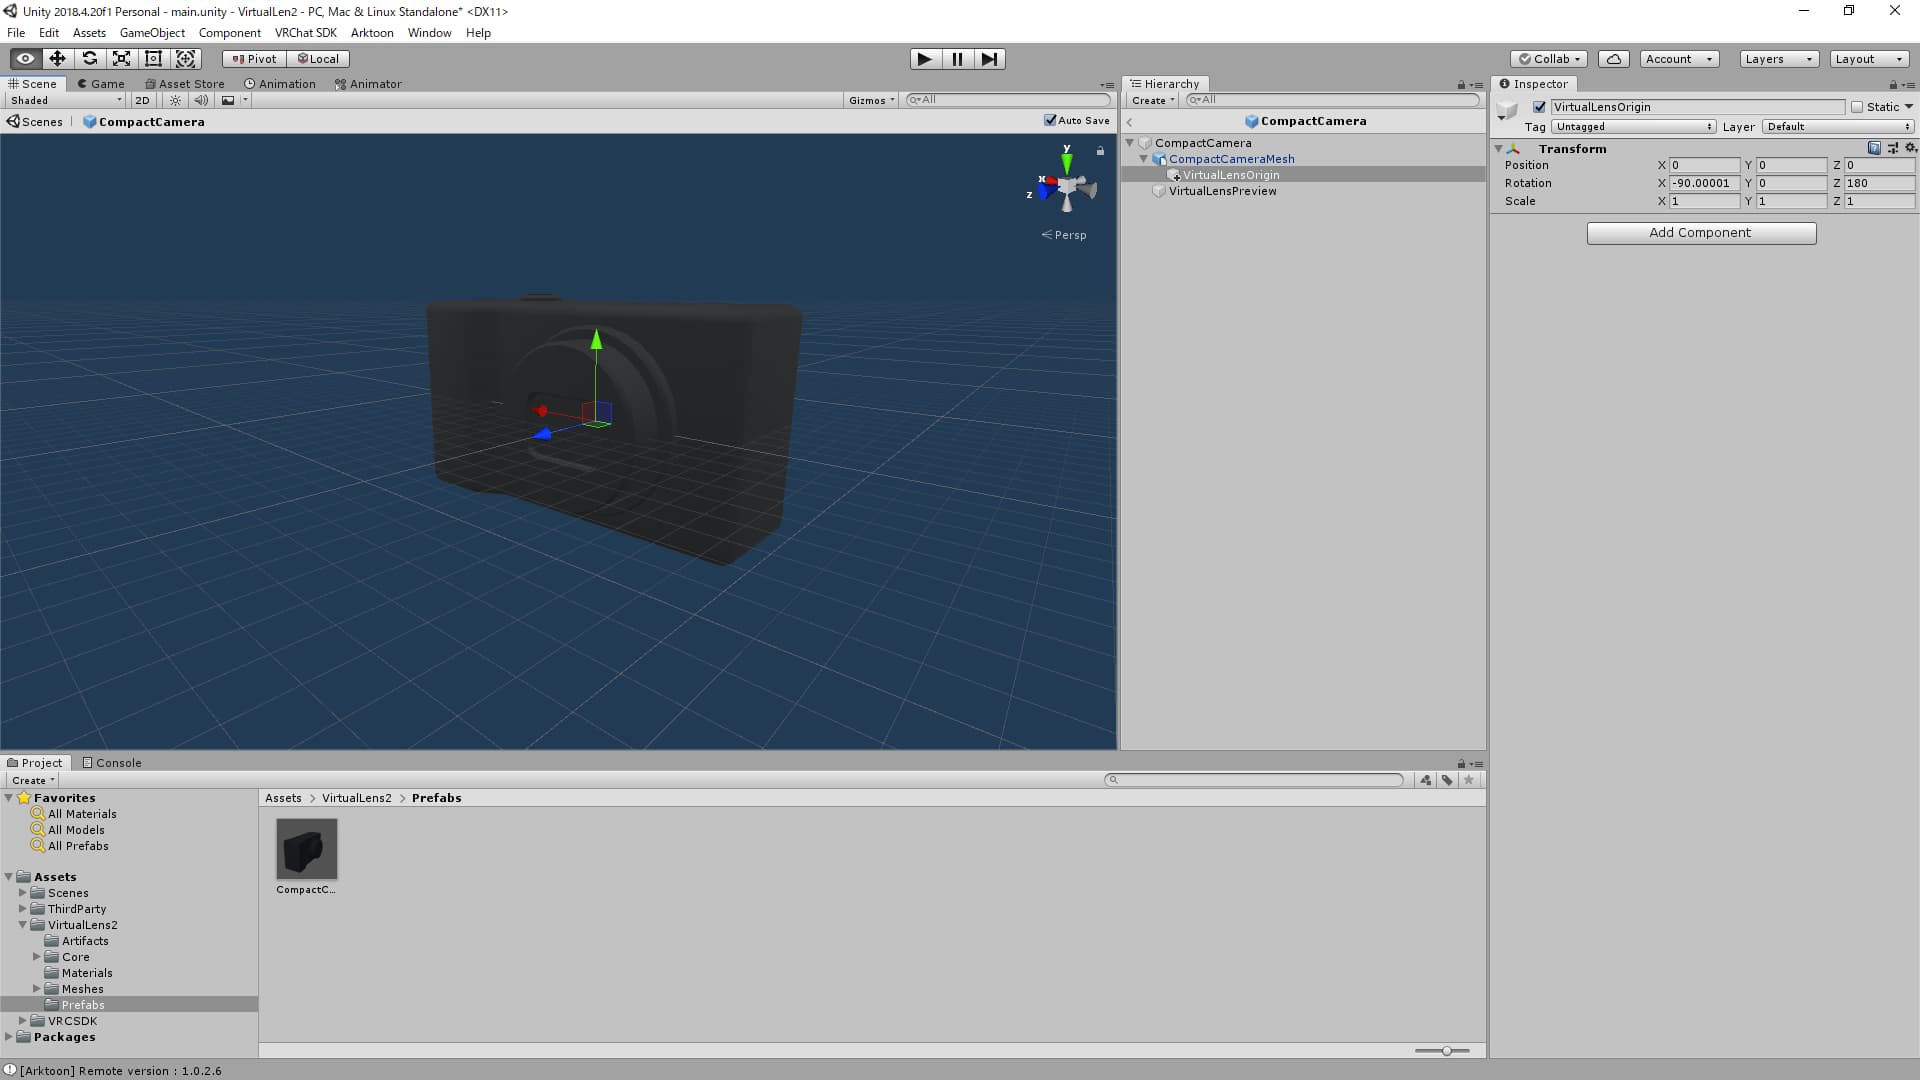
Place the mesh you want to use as a child of NonPreviewRoot. Since the camera captures from the position of VirtualLensOrigin, adjust the position of VirtualLensOrigin to be at the center of the lens or as needed. Also, be careful that no visible polygons are more than 0.05m away from the line of sight (positive Z-axis direction) from VirtualLensOrigin as this could cause reflections in the camera mesh.
Adjusting the Preview Screen Position
Adjust the position and size of the preview screen, including the touch screen PreviewWrapper. When doing this, make sure to set the Scale values (x, y, z) to the same value to maintain the aspect ratio.

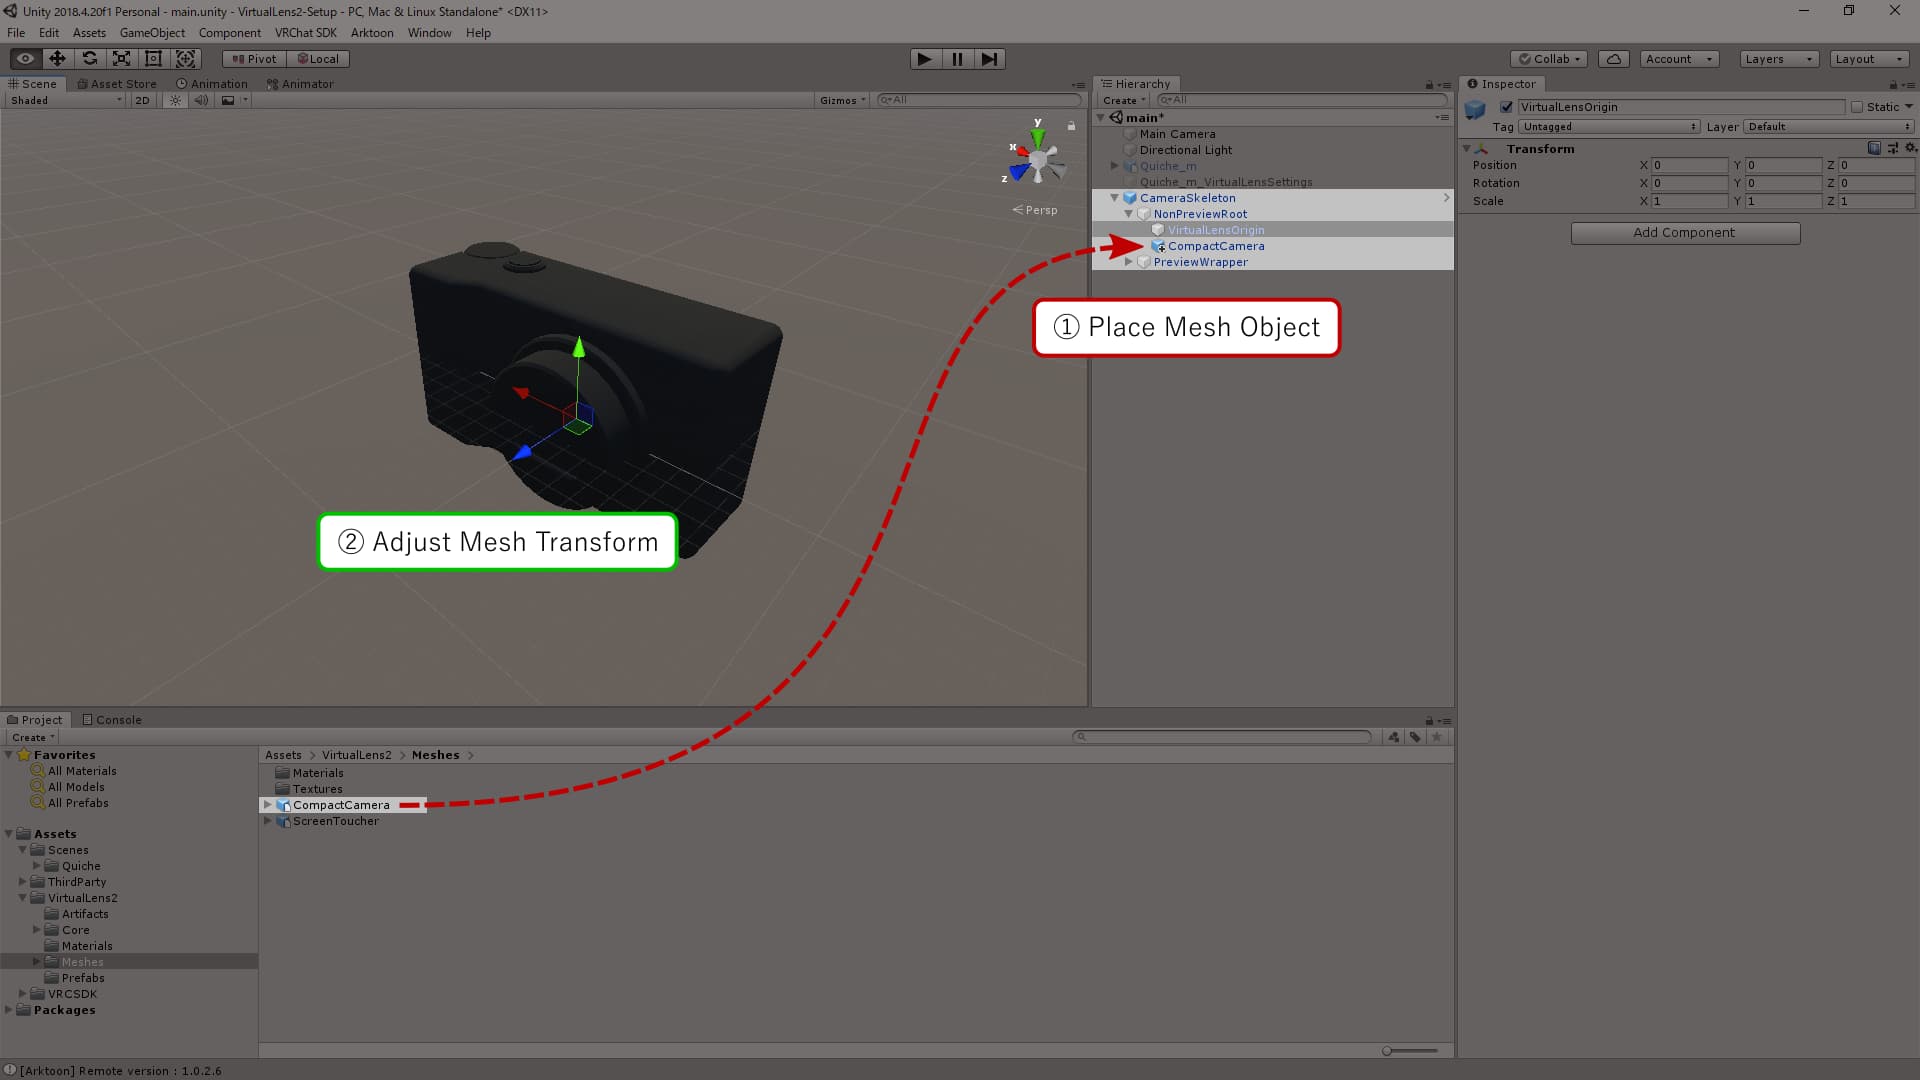
Modifying Parent-Child Relationships within the Avatar
After adjusting the position of CameraSkeleton, move it to be a child of the objects you want to interact with.
Updating Settings
Update the settings in VirtualLens Settings under the “Camera Object” section as follows, then press the “Apply” button to apply the settings:
Root Object:CameraSkeletonNon-Preview Root:NonPreviewRoot
Note that if you change the position of objects after applying the settings, you will need to press the “Apply” button again to update the settings.
Detailed Explanation
Reference Objects
VirtualLens2 uses objects with specific names as references to automatically generate various components. By preparing these objects appropriately, you can use your custom 3D model as a camera. In this section, we will explain how to position reference objects using the camera model included with VirtualLens2 (Assets/VirtualLens2/Prefabs/CompactCamera.prefab) as an example.
VirtualLensOrigin
This object serves as the reference when placing the camera component for capturing. The positive Z-axis of this object represents the front, and the positive Y-axis represents the up direction. The camera component is generated based on this orientation.
VirtualLensPreview
This object serves as the reference for interface placement to specify the focus point. The camera component for touch detection is generated based on the orientation and Y-axis scale of this object.
It’s worth noting that CompactCamera.prefab includes a MeshRenderer for the preview screen, but this is not mandatory. You have the option to render it on a different object or not render it at all.
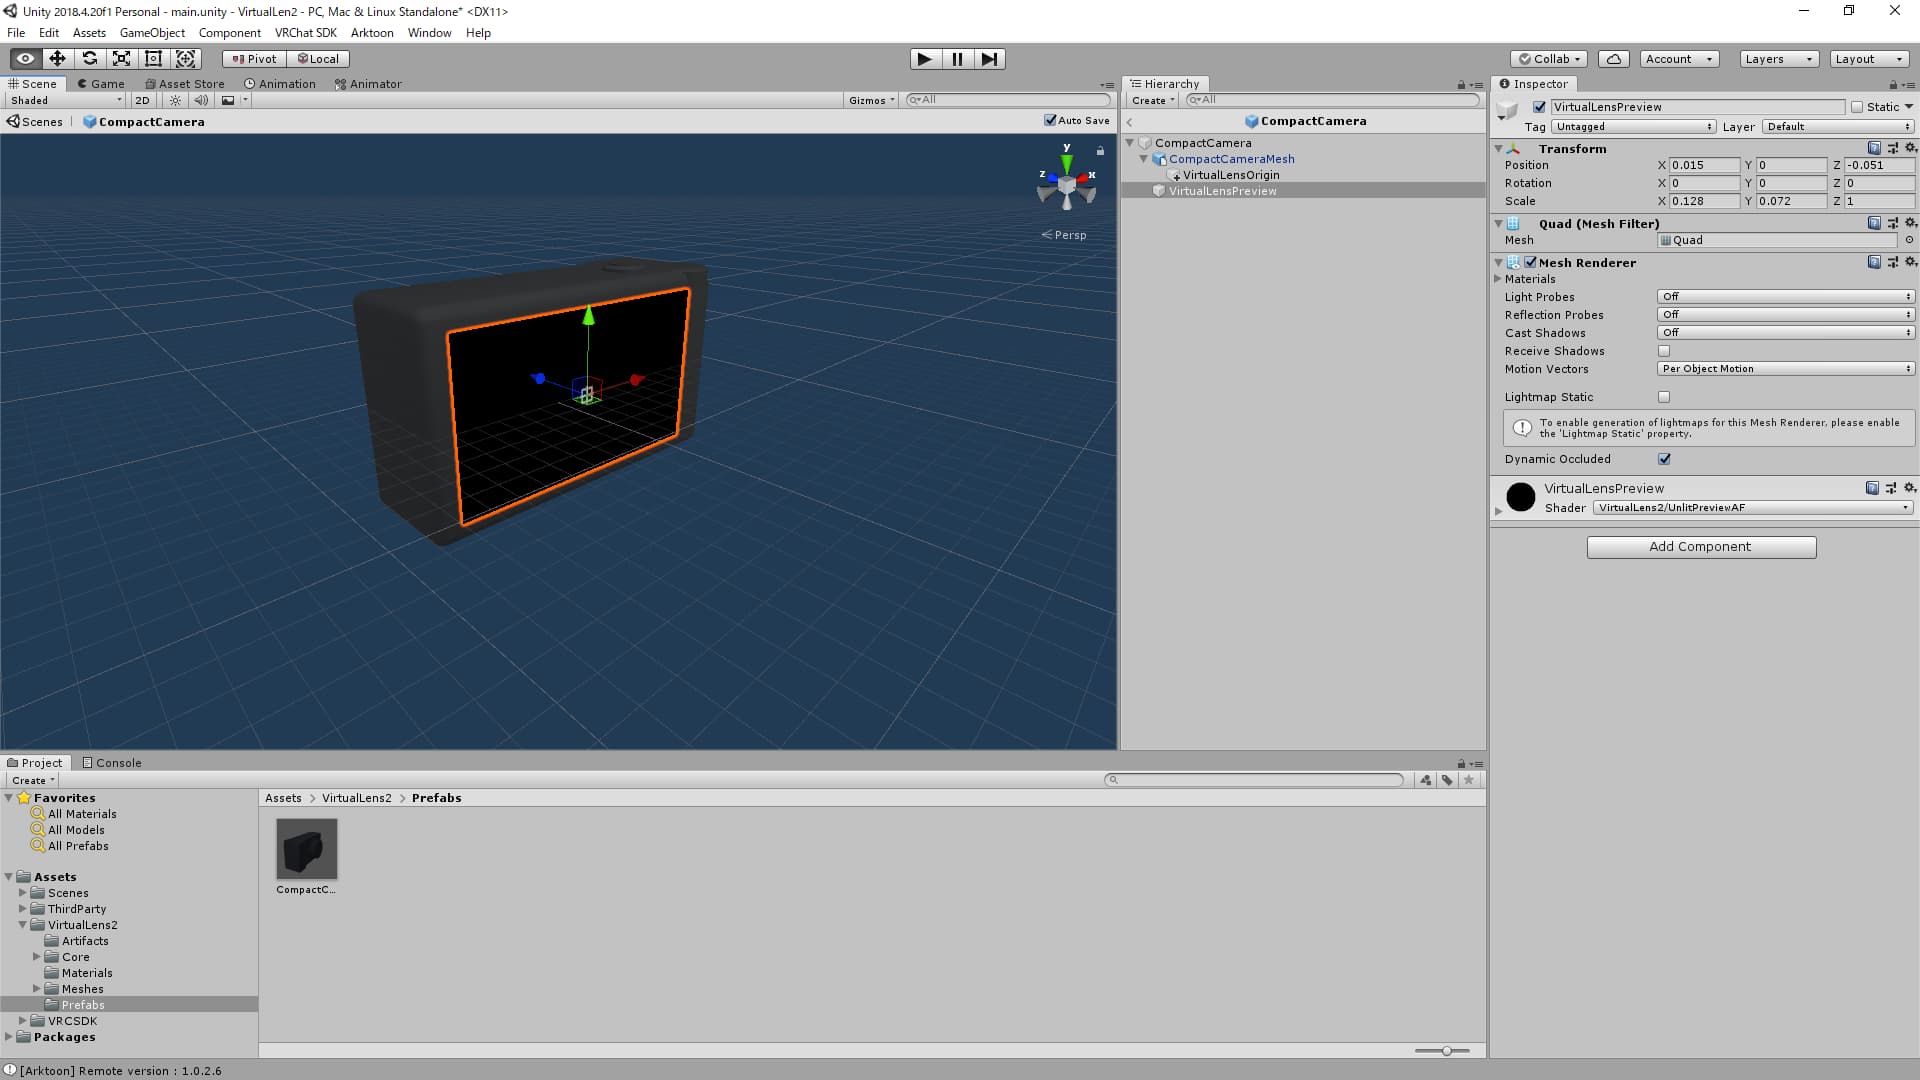
Preview Material
A material for the preview screen is provided as Assets/VirtualLens2/Materials/VirtualLensPreview.mat. You can apply it to objects like a quad to generate a preview screen that includes touch information. You can find examples of its usage in the contents of the package, such as CompactCamera.prefab.
Distributing VirtualLens2-Compatible 3D Models
If you intend to distribute a 3D model designed for use with VirtualLens2, consider preparing a prefab that includes the reference objects mentioned earlier and uses the VirtualLensPreview.mat material for the preview screen. This will simplify the setup when integrating it with VirtualLens2. If you plan to distribute or sell your model, including such a prefab is a good idea.
3.3 - High-Resolution Mode
This section provides information on the settings and considerations for performing high-resolution capturing with VirtualLens2.
Basic Settings
VirtualLens2 Settings
When setting up your avatar, configure the “Default Resolution” under Algorithm Settings in VirtualLens Settings to the resolution you normally use.
If you need to temporarily use a different resolution, you can adjust the internal resolution via the Expressions Menu. Be sure to also update the settings on the VRChat standard camera accordingly.
VRChat Settings
In the built-in VRChat camera menu, select a resolution that matches the VirtualLens2 settings.
Considerations
Behavior When Settings Don’t Align
If the resolution settings in VirtualLens2 and VRChat do not match, it may result in image degradation. Ensure the settings are aligned for optimal quality.
Compatibility with Stream Camera
When using Stream Camera, its resolution is determined by the size of the desktop window. If the window size is not adjusted correctly, it may cause image quality issues similar to those caused by mismatched settings.
If you need finer control over the output resolution, consider using Spout in conjunction with VirtualLens2.
3.4 - Creating Setting Templates
This section explains how to create setting templates for use during VirtualLens2 setup.
VirtualLens2 has a variety of configuration parameters, and when you need to set up for multiple avatars with almost identical settings, it can become a time-consuming task to input the parameters repeatedly. In such cases, creating setting templates can help you streamline the process by skipping the input of common parameters.
Creating Setting Prefabs
Start by performing the setup using the standard procedure. The object with VirtualLens Settings that is generated during this setup can be turned into a setting prefab by dragging and dropping it into the project view. When doing this, you will be prompted to either create a new prefab or create a prefab variant. Generally, it is recommended to create it as a prefab variant.
v2.9.0-: A default setting prefab (VirtualLens2/Prefabs/DefaultSettings.prefab) is now provided. VirtualLens Settings created by the setup helper in versions prior to v2.8.x does not reference this prefab. Therefore, it is recommended to recreate the setting prefab for compatibility with future updates.
Using Setting Prefabs
When setting up VirtualLens2 for a new avatar, specify the prefab you created in the “Settings Template” field of the setup helper. This will enable the settings to be based on the template you created instead of using the default settings that come with VirtualLens2.
4 - Developer Guide
This section compiles information for developers who want to interact with parameters and coordinate with other gadgets or external control.
About Parameters
By reading and writing parameters used within VirtualLens2, you can control the behavior of VirtualLens2 from other gadgets. Below is a list of accessible parameters and their explanations.
Using via OSC
The following parameters can also be operated via OSC. However, VRChat typically converts spaces (" ") in parameter names to underscores ("_") when generating OSC addresses. Therefore, if you are controlling parameters via OSC, you will need to adjust accordingly. For example, to control the VirtualLens2 Zoom parameter, use the address /avatar/parameters/VirtualLens2_Zoom.
Legend
- Synchronization
- Synchronized Synchronized with other players.
- Non-synchronized Not synchronized with other players.
- Optional-synchronized Synchronized only if enabled during setup.
- Access control
- Read/Write Both reading and writing are available.
- Read only Read-only parameters. Changing them may cause unintended behavior.
- Write only Write-only parameters. The values they take may not be explicitly defined.
Core Elements
VirtualLens2 Control
Synchronized Write only
Used for synchronization with other players, accepting menu input, and receiving control commands via OSC. It can only be used from external sources for sending commands.
Sending Control Commands
Deprecated
Control command reception usingVirtualLens2 Control is being deprecated due to updates in VRCSDK. For future applications, operate the corresponding variables directly if you need to handle parameters via OSC.
If you need to handle parameters not registered in VRCExpressionParameters via OSC, you can update them by writing following values to VirtualLens2 Control.
| Value | Description |
|---|---|
| 1 | (Reserved) |
| 2 | Disable |
| 3 | Enable |
| 4 | Auto Leveler: Disable |
| 5 | Auto Leveler: Horizontal |
| 6 | Auto Leveler: Vertical |
| 7 | (Reserved) |
| 8 | Stabilizer: Disable |
| 9 | Stabilizer: Weak |
| 10 | Stabilizer: Medium |
| 11 | Stabilizer: Strong |
| 12 | Pickup |
| 13 | Drop |
| 14 | Reposition |
| 15 | (Reserved) |
| 16 | Reposition Scale: 1x |
| 17 | Reposition Scale: 3x |
| 18 | Reposition Scale: 10x |
| 19 | Reposition Scale: 30x |
| 20 | Pin: Store 1 |
| 21 | Pin: Store 2 |
| 22 | Pin: Store 3 |
| 23 | Pin: Store 4 |
| 24 | Pin: Load 1 |
| 25 | Pin: Load 2 |
| 26 | Pin: Load 3 |
| 27 | Pin: Load 4 |
| 28 | External Pose: Disabled |
| 29 | External Pose: Enabled |
| 30 | Focus Lock: Disabled |
| 31 | Focus Lock: Enabled |
| 32 | AF Mode: Point AF |
| 33 | AF Mode: Face AF |
| 34 | AF Mode: Selfie AF |
| 35 | (Reserved) |
| 36 | Tracking Speed: Immediate |
| 37 | Tracking Speed: Fast |
| 38 | Tracking Speed: Medium |
| 39 | Tracking Speed: Slow |
| 40 | Focusing Speed: Immediate |
| 41 | Focusing Speed: Fast |
| 42 | Focusing Speed: Medium |
| 43 | Focusing Speed: Slow |
| 44 | Mesh Visibility: Show |
| 45 | Mesh Visibility: Hide |
| 46 | Grid: None |
| 47 | Grid: 3x3 |
| 48 | Grid: 3x3+Diagonal |
| 49 | Grid: 6x4 |
| 50 | (Reserved) |
| 51 | (Reserved) |
| 52 | Information: Hide |
| 53 | Information: Show |
| 54 | Leveler: Hide |
| 55 | Leveler: Show |
| 56 | Peaking: Disable |
| 57 | Peaking: MF Only |
| 58 | Peaking: Always |
| 59 | (Reserved) |
| 60 | Far Plane: Default |
| 61 | Far Plane: 10x |
| 62 | Far Plane: 100x |
| 63 | (Reserved) |
| 64 | Transfer Mode Permissive |
| 65 | Transfer Mode: Strict |
| 66 | Depth Enabler: Disable |
| 67 | Depth Enabler: Enable |
VirtualLens2 Enable
Synchronized Read/Write
Indicates whether VirtualLens2 is enabled. It is 1 when enabled and 0 when disabled.
VirtualLens2 AltMesh
Synchronized Read only
Indicates whether the camera model’s display is replaced with an alternate mesh. When the display is replaced, it is 1, otherwise 0.
Note that there is a difference in behavior between local and remote when it is handheld and image stabilization is enabled. In the local context, it is 1, while in the remote context, it is 0.
Basic Functions
VirtualLens2 Zoom
Optional-synchronized Read/Write
Set between 0.0 and 1.0 according to the focal length. You can calculate the conversion from parameter value \( x \) to focal length \( f \) using the following equation. Here, \( f_{\min} \) and \( f_{\max} \) correspond to the Min focal length and Max focal length in the setup items, respectively.
$$ f = f_{\min} \exp \Bigl\{ x \log \frac {f_{\max}} {f_{\min}} \Bigr\} $$
VirtualLens2 Aperture
Optional-synchronized Read/Write
Set between 0.0 and 1.0 according to the aperture (F number). You can calculate the conversion from parameter value \( x \) to F number using the following equation. Here, \( F_{\min} \) and \( F_{\max} \) correspond to the Min F number and Max F number in the setup items, respectively.
$$ F = F_{\min} \exp \Bigl\{ x \log \frac {F_{\max}} {F_{\min}} \Bigr\} $$
VirtualLens2 Exposure
Optional-synchronized Read/Write
Set between 0.0 and 1.0 according to the exposure compensation. You can calculate the conversion from parameter value \( x \) to correction value \( E \) [EV] using the following equation. Here, \( E_r \) corresponds to the Exposure Range in the setup items.
$$ E = (2x-1)E_{r} $$
Position and Orientation Control
VirtualLens2 PositionMode
Non-synchronized Read only
Indicates the current position adjustment mode. The correspondence between values and modes is as follows:
| Value | Description |
|---|---|
| 0 | Camera is held directly in hand. |
| 1 | Camera is fixed in world space. |
| 2 | Camera pose is controlled by the reposition feature. |
| 3 | Camera pose is controlled by the drone feature. |
VirtualLens2 AutoLeveler
Non-synchronized Read/Write
Indicates the current auto-leveling mode. The correspondence between values and modes is as follows:
| Value | Description |
|---|---|
| 0 | Auto-leveling feature is disabled. |
| 1 | Keeps horizontal orientation. |
| 2 | Keeps vertical orientation. |
| 3 | Snap camera rotation in 30-degree increments. |
VirtualLens2 Stabilizer
Non-synchronized Read/Write
Indicates the current image stabilization mode. The correspondence between values and modes is as follows:
| Value | Description |
|---|---|
| 0 | Disabled |
| 1 | Weak |
| 2 | Medium |
| 3 | Strong |
VirtualLens2 RepositionScale
Non-synchronized Read/Write
Sets the scaling factor for movement when using the reposition feature. The correspondence between values and multipliers is as follows:
| Value | Multiplier |
|---|---|
| 0 | 1x |
| 1 | 3x |
| 2 | 10x |
| 3 | 30x |
VirtualLens2 LoadPin
Non-synchronized Write only
By writing a value in the range of 1 to 4, the camera is moved to the corresponding pin position.
VirtualLens2 StorePin
Non-synchronized Write only
By writing a value in the range of 1 to 4, the current camera position is registered as the position for the corresponding pin.
VirtualLens2 ExistPin[1-4]
Non-synchronized Read only
Indicates whether the corresponding pin position is registered. It is 1 when registered and 0 when not registered.
VirtualLens2 ExternalPose
Non-synchronized Read/Write
Indicates whether external pose input is enabled. It is 1 when enabled and 0 when disabled.
Focus Control
VirtualLens2 AFMode
Non-synchronized Read/Write
Indicates the autofocus mode. The correspondence between values and modes is as follows:
| Value | Description |
|---|---|
| 0 | Point AF |
| 1 | Face AF |
| 2 | Selfie AF |
VirtualLens2 AFSpeed
Non-synchronized Read/Write
Indicates the speed of focus plane adjustment by autofocus. The correspondence between values and settings is as follows:
| Value | Description |
|---|---|
| 0 | Immediate |
| 1 | Fast |
| 2 | Medium |
| 3 | Slow |
VirtualLens2 TrackingSpeed
Non-synchronized Read/Write
Indicates the speed at which, when using face detection autofocus, it switches to tracking another face after failing to detect a face. The correspondence between values and settings is as follows:
| Value | Description |
|---|---|
| 0 | Immediate |
| 1 | Fast |
| 2 | Medium |
| 3 | Slow |
VirtualLens2 FocusLock
Non-synchronized Read/Write
A flag to temporarily stop updating the focus plane. When it is 1, the update of the focus plane is stopped, and when it becomes 0, it resumes.
VirtualLens2 Distance
Optional-synchronized Read/Write
Indicates the distance to the plane where the focus is set during manual focus, ranging from 0.0 to 1.0. You can calculate the conversion from parameter value \( x \) to distance \( D \) [m] using the following equation. Here, \( D_{\min} \) and \( D_{\max} \) correspond to the Min focus distance and Max focus distance in the setup items.
$$ D = D_{\min} \exp \Bigl\{ x \log \frac {D_{\max}} {D_{\min}} \Bigr\} $$
VirtualLens2 TouchOverride
Non-synchronized Read/Write
This flag is used to simulate touchscreen operations through avatar parameters. While set to 1, the coordinates specified by TouchOverrideX and TouchOverrideY are considered touched.
VirtualLens2 TouchOverrideX, VirtualLens2 TouchOverrideY
Non-synchronized Read/Write
When simulating touchscreen operations through the TouchOverride parameter, set the coordinates considered as touched in the range of -1.0 to 1.0 for both X and Y. The X coordinate increases from left to right, and the Y coordinate increases from bottom to top.
Screen Settings
VirtualLens2 Grid
Non-synchronized Read/Write
Sets the type of grid to display on the preview screen. The correspondence between values and types is as follows:
| Value | Description |
|---|---|
| 0 | None |
| 1 | 3x3 |
| 2 | 3x3 with Diagonals |
| 3 | 6x4 |
| 4-7 | Custom Grid 1-4 |
VirtualLens2 Information
Non-synchronized Read/Write
Sets whether to display information such as focal length and F number on the preview screen. It is 1 when displayed and 0 when not displayed.
VirtualLens2 Level
Non-synchronized Read/Write
Sets whether to display a level on the preview screen. It is 1 when displayed and 0 when not displayed.
VirtualLens2 Peaking
Non-synchronized Read/Write
Sets the condition for emphasizing the range with correct focus on the preview screen. The correspondence between values and conditions is as follows:
| Value | Description |
|---|---|
| 0 | Always disabled |
| 1 | Enabled only during manual focus |
| 2 | Always enabled |
Mask Settings
VirtualLens2 LocalPlayerMask
Non-synchronized Read/Write
Select whether to reflect the shooter’s own avatar. Set to 1 if reflecting, 0 if not.
VirtualLens2 RemotePlayerMask
Non-synchronized Read/Write
Select whether to reflect avatars of players other than the shooter. Set to 1 if reflecting, 0 if not.
VirtualLens2 UIMask
Non-synchronized Read/Write
Select whether to reflect UI elements. Set to 1 if reflecting, 0 if not.
Other Settings
VirtualLens2 Hide
Synchronized Read/Write
Controls the visibility of meshes specified in Hideable Meshes. Set to 1 to hide and 0 to show.
VirtualLens2 PreviewHUD
Non-synchronized Read/Write
Controls the visibility of the preview HUD. Set to 1 to show and 0 to hide.
VirtualLens2 FarPlane
Non-synchronized Read/Write
Adjusts the culling distance on the far side. The correspondence between values and settings is as follows:
| Value | Description |
|---|---|
| 0 | Default value (specified during setup) |
| 1 | Default value × 10 |
| 2 | Default value × 100 |
VirtualLens2 DepthEnabler
Non-synchronized Read/Write
Controls a mechanism to ensure the stable operation of shaders that depend on depth textures. It is 1 when enabled and 0 when disabled.
VirtualLens2 DepthCleaner
Non-synchronized Read/Write
Controls the mechanism for clearing the _CameraDepthTexture on the built-in camera. The values correspond to the following settings:
| Value | Description |
|---|---|
| 0 | Disabled |
| 1 | Clears using the nearest value |
| 2 | Clears using the farthest value |
VirtualLens2 Resolution
Non-synchronized Read/Write
Sets the resolution of the texture used for internal processing. The values correspond to the following settings:
| Value | Description |
|---|---|
| 0 | FHD (1080p, 1920x1080) |
| 1 | QHD (1440p, 2560x1440) |
| 2 | 4K (2160p, 3840x2160) |
| 3 | 8K (4320p, 7680x4320) |
Reading Avatar Settings
VirtualLens2 Version
Non-synchronized Read only
If VirtualLens2 vX.Y.Z is set up, the integer value X * 10000 + Y * 100 + Z is set.
VirtualLens2 Zoom Min, VirtualLens2 Zoom Max
Non-synchronized Read only
Sets the lower and upper limits for the focal length, \( f_{\min} \), and \( f_{\max} \) in millimeters as floating-point numbers.
VirtualLens2 Aperture Min, VirtualLens2 Aperture Max
Non-synchronized Read only
Sets the lower and upper limits for the aperture (F number), \( F_{\min} \), and \( F_{\max} \) as floating-point numbers.
VirtualLens2 Exposure Range
Non-synchronized Read only
Sets the range of correction values, \( E_r \), used for exposure correction as a floating-point number.
VirtualLens2 Resolution X, VirtualLens2 Resolution Y
Non-synchronized Read only
Sets the expected resolution of images from VirtualLens2 as integers.
Usage Examples
Changing Hand Shape with Enabling and Disabling VirtualLens2
By referring to VirtualLens2 Enable and VirtualLens2 AltMesh, you can determine if VirtualLens2 is enabled and the camera mesh is displayed at the hand position. Based on these, if you want to change the hand shape, you can add states and transitions to the hand animation corresponding to the hand sign in the Gesture layer. If Gesture layers' parameter lists are not updated during VirtualLens2 setup, you need to manually add the parameters you want to use to the Animator Controller.
Focus Lock via Hand Sign Input
By using VRCAvatarParameterDriver to rewrite the VirtualLens2 FocusLock parameter, you can use the focus lock feature. Using this, you can add a layer to control parameters based on GestureLeft and GestureRight values to fix focus with specific hand signs.
External Pose Input
If the parameter VirtualLens2 ExternalPose is 1, the camera’s position and orientation will match the object specified in “External Pose Source” during setup, and the camera mesh will be replaced with an alternate model, as in the case of using the drone feature. This allows you to control the camera posture from Avatar Gadgets other than VirtualLens2.
Development Scripts
Scripts used for development, such as generating Animator Controllers and packaging, can be found in VirtualLens2/Core/Generators/Editor and VirtualLens2/Core/Scenes. If you are interested in the internal implementation of VirtualLens2, these scripts may be helpful. To use these scripts, you need to add VL2_DEVELOPMENT as a predefined macro in your project and introduce Animator As Code.
5 - Frequently Asked Questions
Here are some frequently asked questions and their answers regarding VirtualLens2.
Introduction
First, please check for updates in the change log and the download page on Booth to see if there are any updates available. If you are experiencing issues with VirtualLens2 or if the symptoms are due to changes in VRChat client and/or SDK, these issues may have already been fixed by an update.
Setup-related Questions
My avatar’s expressions or gimmicks broke after installation.
In most cases, this is due to the “Write Defaults” settings. Adjust the “Enable Write Defaults” setting within VirtualLens Settings > Advanced Settings appropriately and reapply. You can find more information about “Write Defaults” in the VRChat official documentation.
VirtualLens2 tries to automatically adjust the settings based on the existing FX Layer’s Animator Controller during the setup. However, in cases like the following, it may fail to determine the settings, and manual adjustments are required:
You changed the settings after the setup. There was a mixture of “Write Defaults” settings during the setup.
Changing the Menu Item Installation Location
When using a non-destructive setup, adding the “MA Menu Installer” component to an object that has the VirtualLens Settings component allows menu items to be added according to its settings. By configuring the “Install To” parameter of the added component correctly, you can change the installation location of menu items.
Operation-related Questions
When I switch to Drone Mode, the camera flies off somewhere.
VirtualLens2’s drone function is controlled using the position of the hand without the camera. Therefore, if you move the controlling hand unintentionally, the drone might fly in unintended directions or at unintended speeds. When transitioning to Drone Mode, try operating the menu with both hands lightly extended forward.
Miscellaneous Questions
I want the camera to be visible to others when using the drone function.
Currently, due to constraints in VRChat, correctly synchronizing the camera’s position with others is challenging. Therefore, it is intentionally configured to not be visible to others.
I want to improve my performance rank.
The current method of calculating performance rank counts even objects that are only used locally, so complex local gimmicks like VirtualLens2 tend to have a worse ranking than the actual load when viewed by others. In most cases, when viewed by others, most objects are never activated, and they don’t significantly contribute to the performance. If VRChat’s specifications change in the future to allow correct handling of local objects, we will provide an update to address this.
Reference: [FEEDBACK] Mark local objects explicitly and exclude them from performance rank calculation
Certain worlds may be rendered incorrectly
Due to the effects of post-processing settings or shaders functioning as effects within the world, depth-of-field simulation of VirtualLens2 and/or other effects may not work correctly. While ongoing improvements aim to ensure proper functionality, certain technical constraints remain unresolved. As of now, the following combinations are known to cause rendering issues:
Features that may critically impact VirtualLens2 Usage
- Post-Processing: Depth Of Field
- The captured image may appear overly blurred.
- Objects highly affected by weak directional lights
- When VirtualLens2 is active, it enables a light source, which can significantly alter the appearance of such objects.
- In some cases, users may bypass this issue by temporarily disabling depth texture generation.
Features that may render ineffectively with VirtualLens2
- Post-Processing: Ambient Occlusion
- Post-Processing: Motion Blur
When Things Go Wrong or You Don’t Understand
If you encounter issues or have questions, please contact via the messaging system on Booth or through Twitter DM. Since image sharing is often necessary, contacting via Twitter DM is recommended. In your message, please include the following information to help streamline the communication:
- Whether there were any errors displayed in the console when you clicked the “Apply” button.
- Screenshots of the
VirtualLensSettings. - Screenshots of the
VRC_AvatarDescriptor. - Screenshots of the AV3 Debug screen in VRChat (can be displayed by going to Puppet Menu > Options > Config > Debug).
6 - Changelog
This is a history of VirtualLens2 changes.
VirtualLens2 v2.12.x
Version 2.12.4 (2026-04-29)
- Added a mask setting to control the display and hiding of Items.
Version 2.12.3 (2025-04-08)
- In non-destructive setup mode, parameter type checks for Avatars 3.0 standard parameters are now skipped and delegated to Modular Avatar for conversion.
- Fixed an issue where setup would fail if the avatar contained a Skinned Mesh Renderer bound to eye bones without an assigned mesh.
Version 2.12.2 (2025-03-31)
- Fixed an issue where changes to the default resolution setting made between immediately after setup and until the scene was reloaded were not properly applied.
Version 2.12.1 (2025-03-30)
- Fixed an issue where the build would fail if an Avatar Mask was set on the first layer of the FX Layer.
- Fixed a build failure issue when remote only mode was enabled.
Version 2.12.0 (2025-03-30)
- Added support for 8K (4320p) and QHD (1440p) resolutions.
- Introduced an internal resolution change feature within VRChat.
- Revamped the visual design of the information display on the preview screen.
- Updated the default settings template to enable information display by default.
- Made the depth texture clearing feature for the standard camera configurable.
- Behavior prior to v2.11.4 corresponds to the Nearest setting.
VirtualLens2 v2.11.x
Version 2.11.4 (2025-02-28)
- Fixed an issue where version checking failed during build if VRCFury 1.1188.0 or later was used.
Version 2.11.3 (2024-12-22)
- Fixed an issue in v2.11.2 where automatic configuration of Write Defaults would fail during non-destructive setup.
Version 2.11.2 (2024-11-15)
- Skips adding the camera model if one is already included in the settings template prefab.
- Fixed an issue where functionality could fail if an Avatar Mask was set on the first layer of the FX Layer.
- Resolved an issue with non-destructive setup not working correctly on avatars with multiple FX Layers in their Playable Layers.
- Fixed unnecessary error outputs when using the setup helper.
- Removed unnecessary PhysBones components.
Version 2.11.1 (2024-08-16)
- Fixed an issue where objects belonging to the HardwareObjects layer would not be visible.
Version 2.11.0 (2024-08-15)
- Fixed an issue where certain features, such as drones, were broken in VRChat 2024.3.1.
- As a result, an update to VRCSDK is required. Please refer to the Upgrade Guide for more details.
- Fixed an issue where the stabilization strength adjustment was not functioning correctly.
- Adjusted the auto-placement algorithm for RepositionOrigin objects.
VirtualLens2 v2.10.x
Version 2.10.4 (2024-07-14)
- Added quick selfie mode.
- Removed unnecessary elements from the data used as default values when the avatar’s Expression Parameters are not set.
- Changed the pre-setup path duplication check to only trigger an error when the entire path matches.
- Fixed an issue where the Preview HUD’s orientation could shift when the camera was moved rapidly.
- Fixed an issue where the reference to VirtualLens2’s MA Menu Installer would detach during setup.
Version 2.10.3 (2024-07-06)
- Added support for ParameterProvider introduced in NDMF 1.4.
- This allows obtaining information about parameter consumption from Modular Avatar Information.
- Fixed an issue where error reports were not displayed correctly according to NDMF’s language settings.
- Modified to reuse the MA Menu Installer if it is included in the Settings Template.
- Skipped the Humanoid rig check when the Eye Marker is explicitly set.
Version 2.10.2 (2024-01-29)
- Implemented the use of NDMF’s error reporting interface when using NDMF 1.3.0 and later.
- Added quick turn feature for drone mode.
- Zooming is assigned to up and down on 2D puppet in drone mode.
- Automatically generates MA Menu Installer to control the placement of menu buttons during non-destructive setup.
- Added API to simulate screen touches from avatar parameters (
TouchOverride*). - Fixed an issue where version checks fail in environments with specific editor extensions like VRCFury or Av3Emulator.
- Prevents shadows from being cast by alternative camera meshes used in Drone Mode and similar modes.
- Added error check for existing Animator Controllers where Avatars 3.0 standard parameters exist with unexpected types.
- Changed to allow setup of existing Animator Controller with Avatars 3.0 standard parameters even if they exist with different initial values than expected.
- Fixed an issue where setup fails if
VirtualLensPreviewis not present.
Version 2.10.1 (2023-11-05)
- Fixed an issue where the camera’s movements may be stuttered in Drone Mode.
- Updated the object path duplication check to consider object movement by MA Bone Proxy.
- Corrected the behavior when parts of the camera mesh are specified as Hideable Meshes.
- Enabled video output without the built-in camera in Desktop Mode.
Version 2.10.0 (2023-11-03)
- Officially added support for non-destructive setup using Modular Avatar and NDM Framework.
- With this, the standard setup process has also transitioned to a non-destructive setup.
- For migrating from the previous destructive setup, please refer to the upgrade guide.
- Added auto-snap mode to the auto horizon leveling feature.
- Introduced the preview HUD feature.
- Included the custom grid feature.
- Implemented the layer mask configuration feature.
- Introduced Remote Only Mode, focusing on implementing only the necessary features for avatar display on remote environment.
- Designed for use in mobile platforms such as Android.
- API: Operating via the VirtualLens2 Control parameter is now deprecated.
- Thanks to updates in VRCSDK, you can now directly operate parameters that are not synchronized, so please use that method.
- API: Part of the configuration information used during setup is now delivered as parameters.
- Improved performance related to Animator Controller.
- Fixed issues where it did not work correctly when used with MSAA disabled settings in VRChat 2023.4.1 and later.
VirtualLens2 v2.9.x and Older
For update history prior to this, please refer to the Japanese version page.
7 - Readme
This document contains the terms of use and rights related clauses.
VirtualLens2
Thank you for purchasing VirtualLens2.
This tool is a VR camera extension designed to be integrated into VRChat avatars. It allows for easy adjustments to the field of view without post-processing image degradation and enables post-effects using depth information.
For setup and updates, please refer to the provided web page with detailed instructions: https://vlens2.logilabo.dev/en/docs/
Terms of Use
- The author assumes no responsibility for any claims, damages, or other obligations arising from the use of this tool.
- Regardless of whether modifications are made or not, redistributing any portion or the entirety of this tool is prohibited.
- You are prohibited from making avatars, including components generated using this tool, available to third parties.
- Example: Uploading as public avatars or distributing Prefabs
Third-Party Licenses
This package includes the following software and some of its components. Please refer to the included LICENSE.txt for the licensing terms of each software.
Contacts
- ろじっく (twitter: @logi9_)
- Booth: https://logilabo.booth.pm/